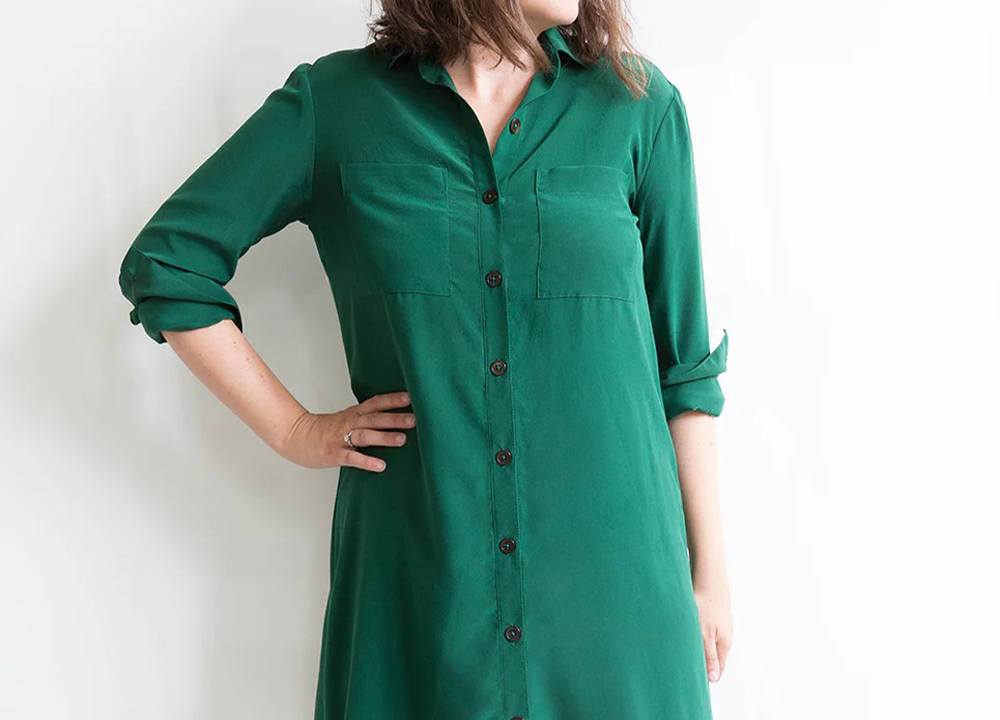
Alder Shirtdress Sew-Along
Selecting Your Fabrics

Cotton & Cotton Blends
Cotton poplin, chambray, and lightweight cotton prints are classic choices for the Alder. These fabrics offer structure while remaining comfortable and breathable. Cotton blends that include rayon or linen provide additional drape and softness. Look for fabrics that aren't too stiff - you want the skirt to flow rather than stand away from your body.
Linen & Linen Blends
Linen creates a relaxed, casual Alder perfect for summer wear. Choose handkerchief linen or lightweight linen blends for the best drape. While linen wrinkles easily, that lived-in quality is part of its charm. Essex linen (a linen-cotton blend) offers a great middle ground with less wrinkling than pure linen while maintaining beautiful drape.
Rayon & Rayon Blends
Rayon challis and lightweight rayon twill create a dressier Alder with beautiful flow and movement. These fabrics drape beautifully for View B's gathered skirt. Keep in mind that rayon can be slippery to work with, so take your time with cutting and pinning. Consider prewashing to prevent shrinkage.
Silk & Silk Blends
For a special occasion Alder, silk twill or silk crepe de chine creates an elegant dress with luxurious drape. These fabrics work particularly well for View A's A-line silhouette. While more challenging to sew, the results are worth the extra care.
Interfacing
You'll need fusible interfacing for the collar, collar stand, and button bands. Choose a lightweight fusible woven or tricot interfacing that complements your fabric weight. Avoid heavy interfacing that will make these areas stiff - you want them crisp but not rigid.
Alder Supply List

Choose Your Size

Grab the Alder Shirtdress Pattern
-
Alder Shirtdress
Sizes 0-18Regular price $22.00 USDRegular priceUnit price per -
Alder Shirtdress
Sizes 14-32Regular price $22.00 USDRegular priceUnit price per


Common Pattern Adjustments

Lengthening and Shortening
Adjust the length of your Alder using the lengthen/shorten lines marked on the pattern pieces, or draw your own if needed. This straightforward technique maintains proper proportions while customizing the fit for your body. The same method applies to any pattern piece — skirt, bodice, or armhole adjustments.
Moving the Dart
Perfect for when your torso length is correct but the dart hits in the wrong spot on your body. Learn to relocate the dart up or down to align with your bust point for the best fit. This adjustment maintains the proper dart takeup while repositioning it to match your body's proportions.
Small and Full Bust Adjustments
The Alder is drafted for a B cup in the 0-18 size range and a D cup in the 14-32 size range. Learn to determine your adjustment amount using upper bust and full bust measurements - if the difference is over 2 inches from your range's drafted cup size, you'll likely need an adjustment. This technique adds room through the bust while maintaining proper fit through shoulders and armholes by slashing, spreading, and reblending the pattern pieces.
Cutting your Fabric

Assembling the Button Bands

Sewing the Darts and Pockets

Attaching the Yoke — Method 1

Attaching the Yoke — Method 2

Side Seams and Skirts

Assembling & Attaching the Collar

Applying Armhole Bias Facing

Hemming the Skirts

Buttons & Buttonholes

Extras
-

Alder + Archer Dress — Method 1
Add the Archer SleevesTransform your Alder into a sleeved shirtdress by combining it with Archer sleeves using this blending method. Extend the armholes to accommodate sleeves, measure sleeve cap ease for proper fit, transfer notches accurately, and find the new shoulder point. This method maintains the Alder's fitted bodice with bust darts.
-
Alder + Archer Dress — Method 2
Try the Simpler MethodCombine the Archer bodice with the Alder skirt for a sleeved shirtdress without complex alterations. This simpler method uses the Archer's looser fit through the bodice and joins it at the waistline with the Alder's slightly flared skirt. Requires only basic blending at side seams and adjusting the right front button band length.
-

Band Collar Pattern Hack
Make a Band CollarCreate a simpler band collar by using only the Alder collar stand pieces without the collar. This streamlined variation requires no additional pattern pieces - just fuse interfacing to one stand piece, sew the upper edge, grade seams, and follow the standard collar attachment instructions. Works well buttoned or unbuttoned for a casual look.
-

Alder as a Tunic or Shirt
Make it a ShirtConvert your Alder into a sleeveless tunic or shirt by simply shortening the pattern pieces. Since the Alder is drafted specifically as a sleeveless garment, it maintains proper armhole fit at any length. Measure from the hollow of your throat to your desired length, mark evenly across all pieces, and follow standard construction methods.
-

V-Neck Pattern Hack
Create a V-NecklineTransform the Alder's collared neckline into a collarless v-neck by redrafting the front and yoke pieces. This variation eliminates the collar pieces and creates a shaped neckline finished with bias binding. Includes guidance on drawing a flattering concave v-shape, attaching button bands at the new neckline, and adjusting buttonhole placement.
-

Tie Front Shirt Pattern Hack
Make a Tie-Front TopCreate a cropped tie-front shirt by modifying the Alder View B front bodice pieces. This variation shortens the front button bands into curved ties that end at the shirt tail, eliminates the skirt entirely, and finishes the hem with bias binding. Perfect for lightweight or sheer fabrics when you want a breezy summer top.


