Thayer Sew-Along: Pattern Adjustments
Shop this post

Thayer Jacket

Thayer Jacket
Today in the Thayer Sew-Along we're going to discuss a few common pattern adjustments. We'll start with blending between sizes, cover lengthening or shortening your pattern, and then talk about full and small bust adjustments. This is also our recommended order for adjustments if you need to do more than one. With that, let's dive in!
Blending Between Sizes
For this example we’re going to continue with the measurements from yesterday’s finding your size post so that you can see what those measurements look like in action. As mentioned previously I’ll be disregarding my waist measurement so I’m blending from a 8 at the bust to a 10 at the hips. You’ll want to blend between the bust and hip (around the waist area) rather than from the bust to the hip because you don’t want to affect the measurements at those points, just the area between them.
You’ll want to make the same blending adjustment to any pattern pieces that cross the point at which you blended. This means if you blend across the waist you’ll need to adjust the center front, side front, back, front lining, and back lining. The yoke would be unaffected in this example because it falls above the bust. I'd also cut a size 8 collar and sleeves because the points at which they attach to the jacket are above the bust as well.
As far as the internal pattern markings like the pocket placement and button hole match points, anything above the bust I left as a size 8 and anything below I went with the markings for the 10.
Lengthening and Shortening
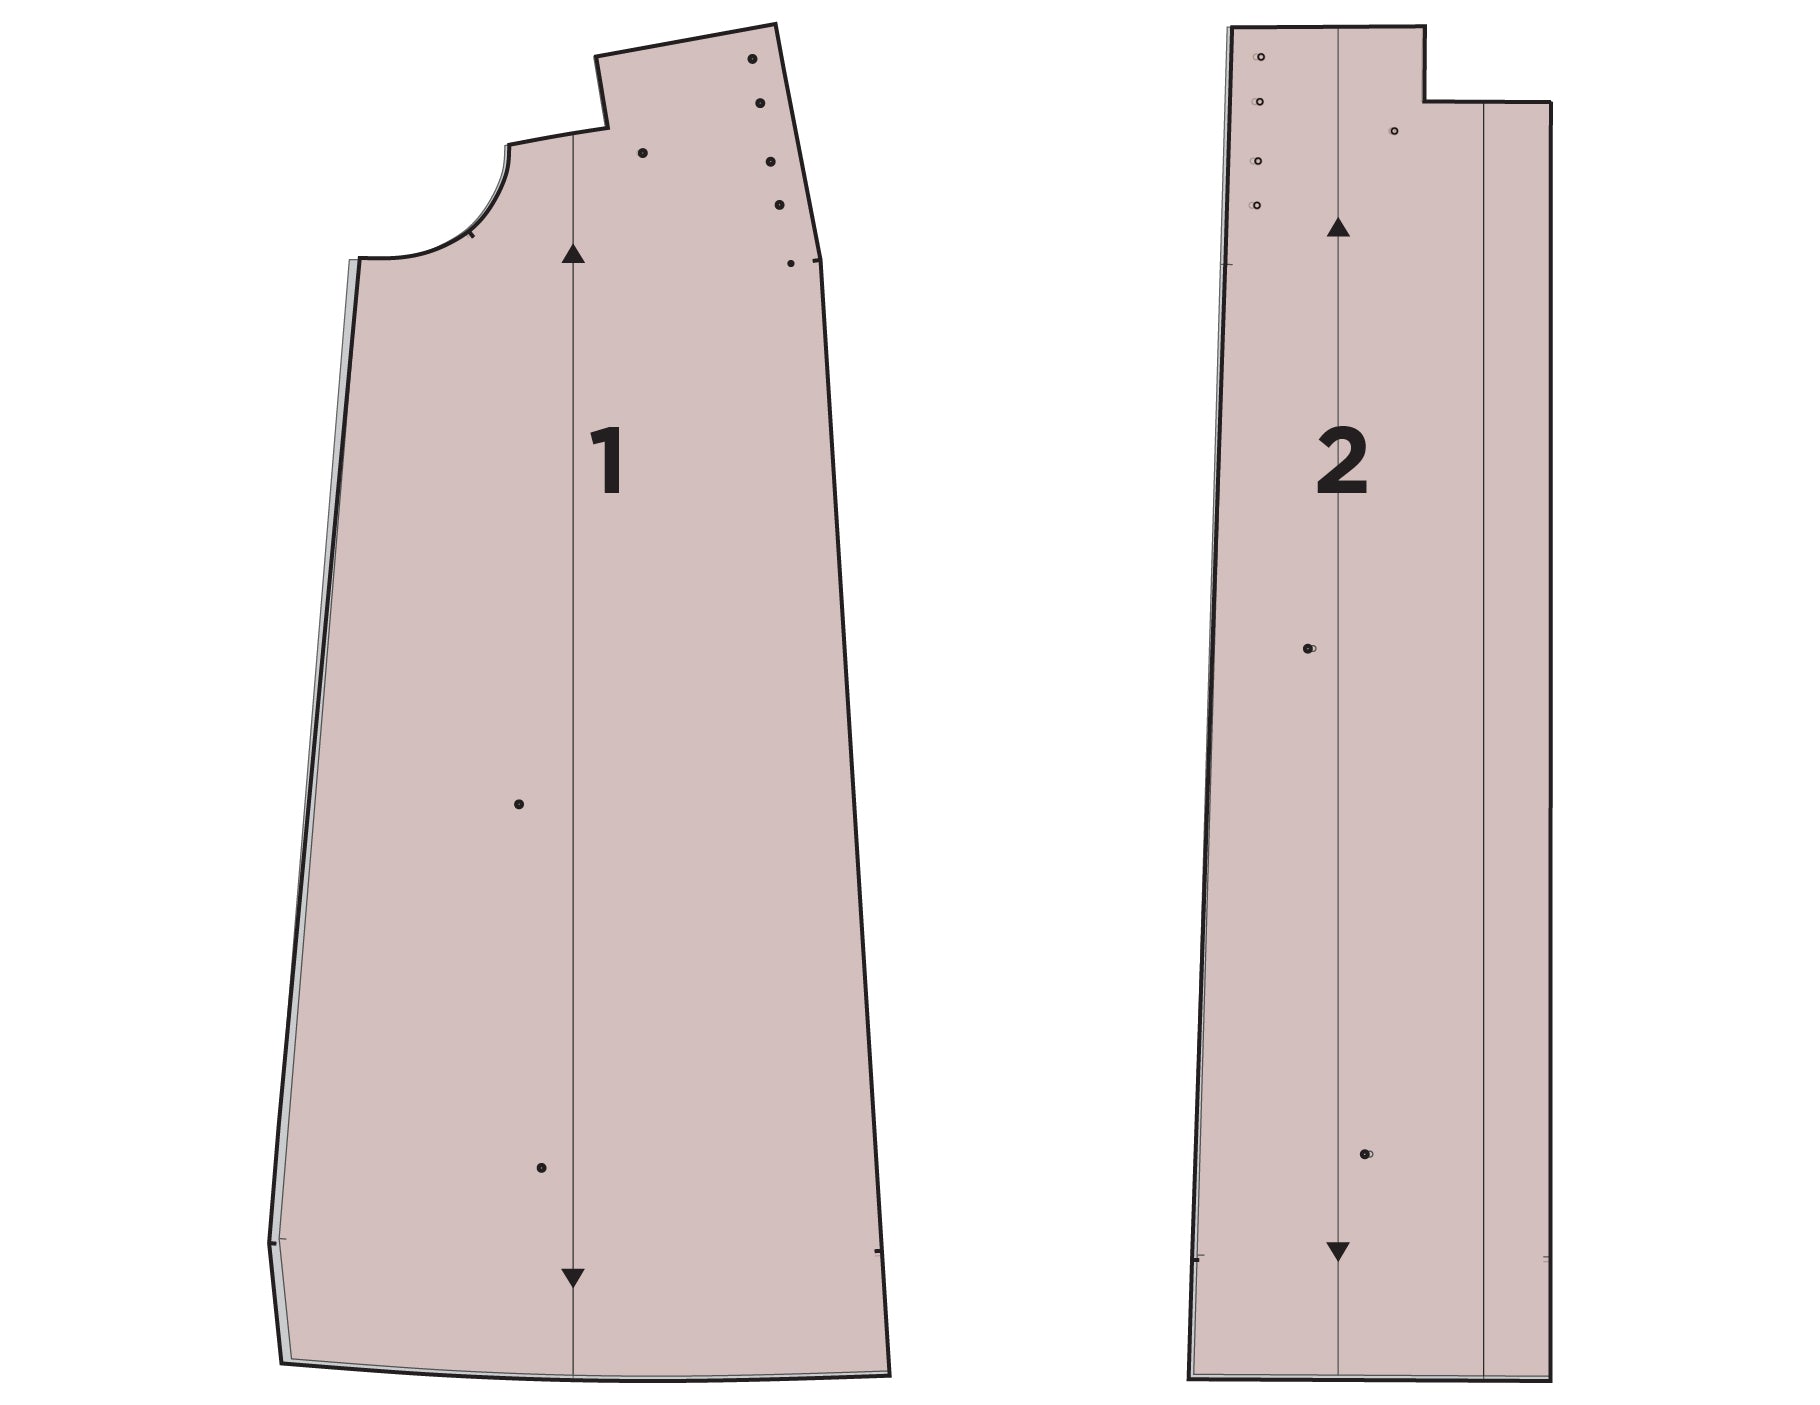
Lengthening and shortening your pattern pieces is pretty straightforward, find the lengthen / shorten lines and apply your length changes between them. The pattern pieces below are a size 20 from the 14–32 D-cup size range.
- Start by locating the pattern pieces you need to adjust.
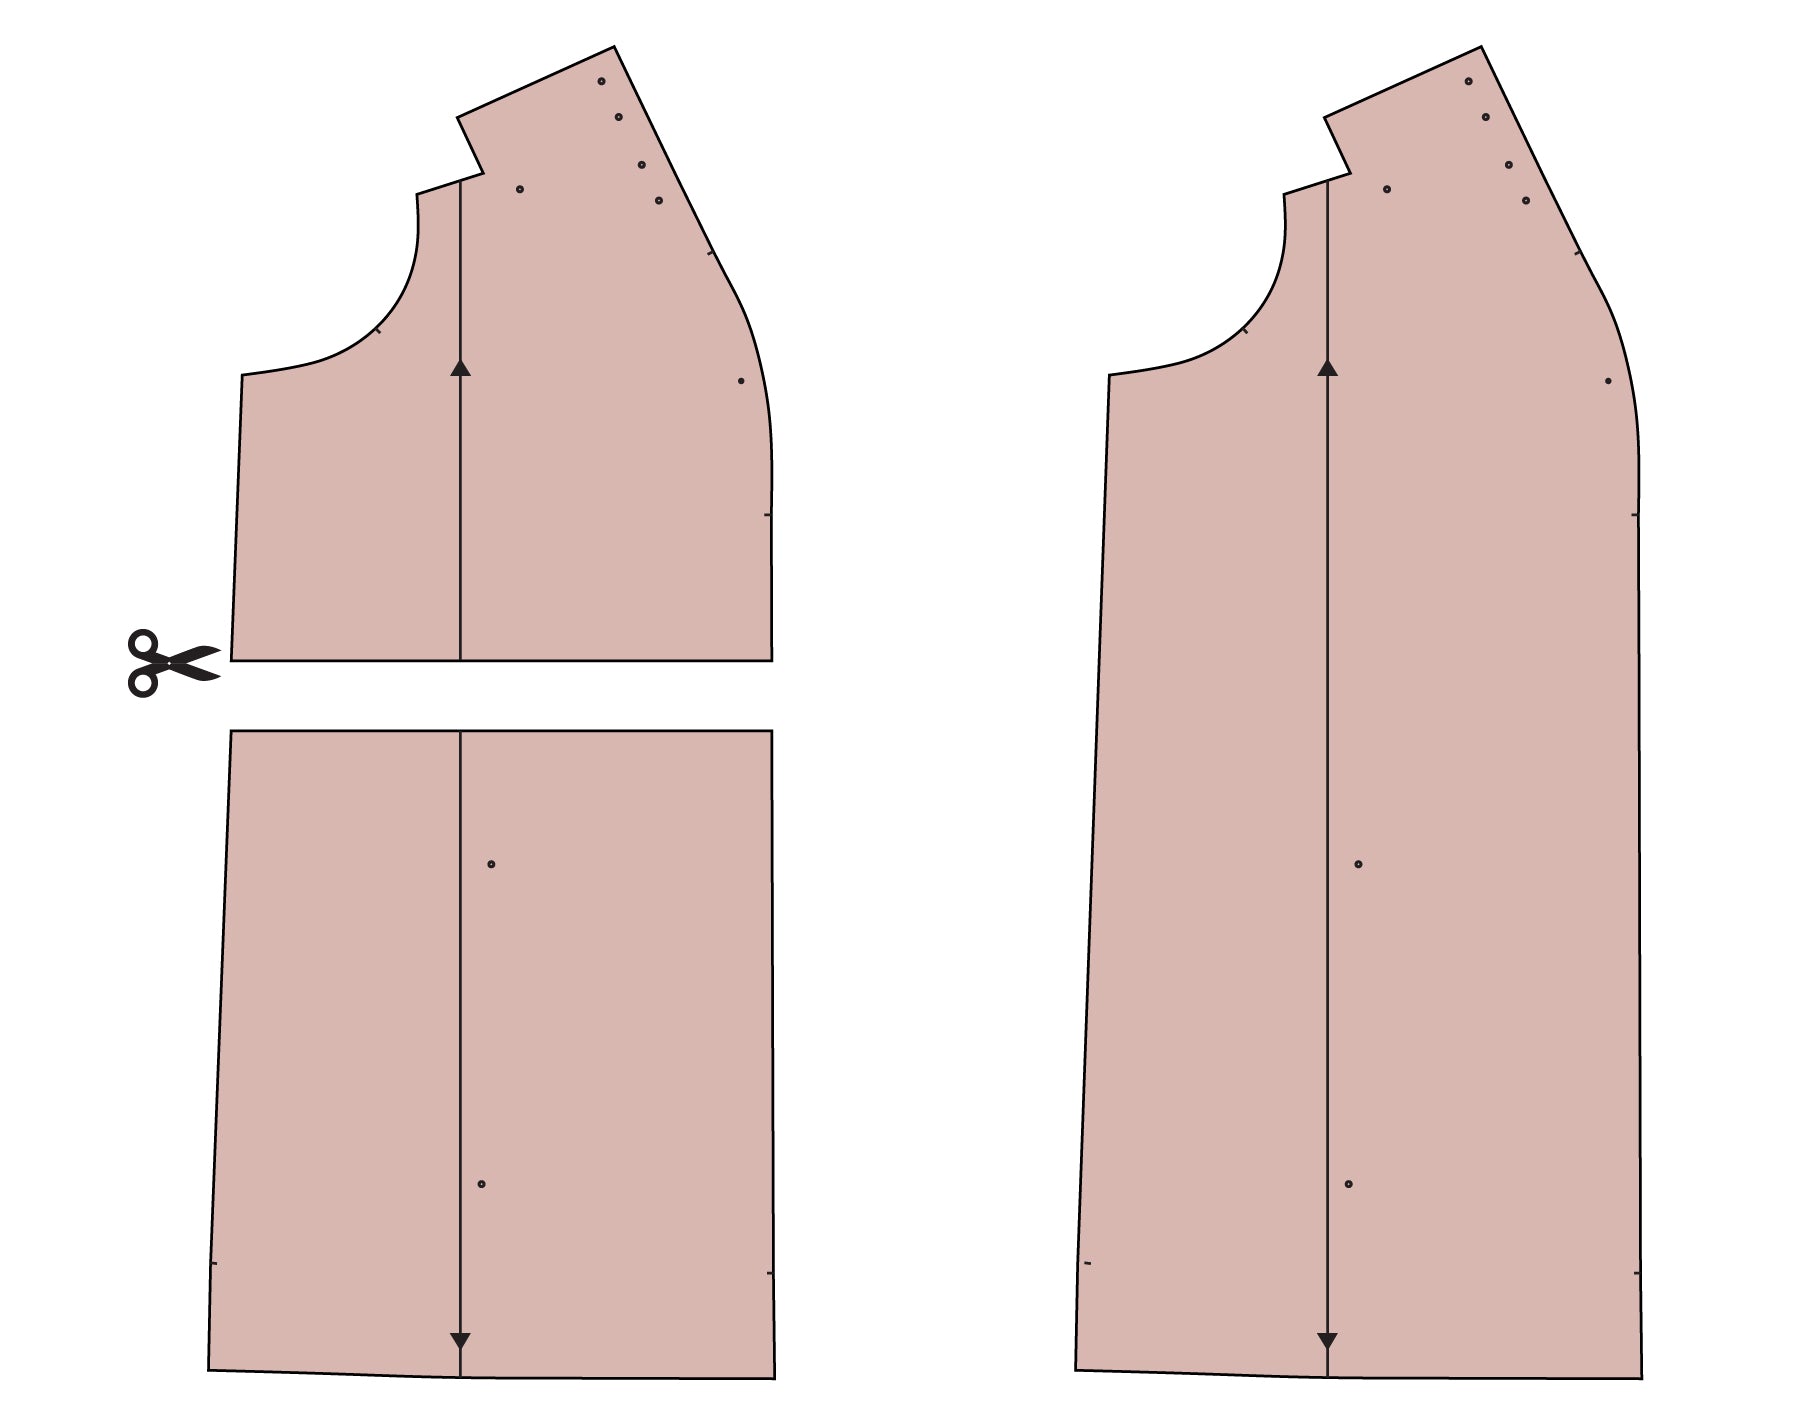
- Cut between the lengthen / shorten lines marked on the pattern. With a piece of paper underneath the pattern, spread the two sections the amount you need to lengthen your piece, making sure to keep the grain line of the two pieces aligned.
- Trace your piece off onto the paper and re-blend any jagged edges along the side seam. Repeat the adjustment to any other affected pieces. If you're lengthening the sleeves, make sure you make the changes to both the upper and under sleeves. If it's the bodice, you'll need to adjust not just the center front, side front and back, but also the front lining and back lining.
If you’re shortening the same steps apply only rather than spreading the pieces apart, you’ll be overlapping them the amount you need to shorten the pattern.
Bust Adjustments
Now let's talk Bust Adjustments. The Thayer Jacket comes in both of our size ranges, 0–18 B-Cup and 14–32 D-Cup. This refers to sewing cup size, not bra cup size. Sewing cup size is determined by subtracting your upper bust measurement from your lower bust measurement, while bra size also takes the under bust into account. This means your sewing cup and bra cup sizes can differ.
In the case of the B-cup, there will be a 2" difference between the upper and full bust. For the D-cup, that difference is 4". The first thing you need to do before you start any bust adjustment is to figure out what sort of an adjustment you’ll need, if any. Subtract your upper bust from your full bust. If the number you get differs from the measurement associated with each cup size, you might need to make an adjustment. Over the number and you'll need a full bust adjustment and under, a small.
For example if you're working with the 0–18 pattern with a full bust of 40″ and an upper bust of 36″ you’d subtract 40 - 36 to get 4″ which would require a full bust adjustment.
Now take your new number, in our case 4″, and subtract 2″ from it to get the full amount of your bust adjustment. Subtracting the 2″ comes from the fact that the pattern is drafted for a B cup which is a 2″ difference. Since this amount is already drafted into the pattern you are just adding the additional amount on top of what exists. You would then divide the full amount of the adjustment in half so you would be doing a 1″ adjustment on each side of the pattern.
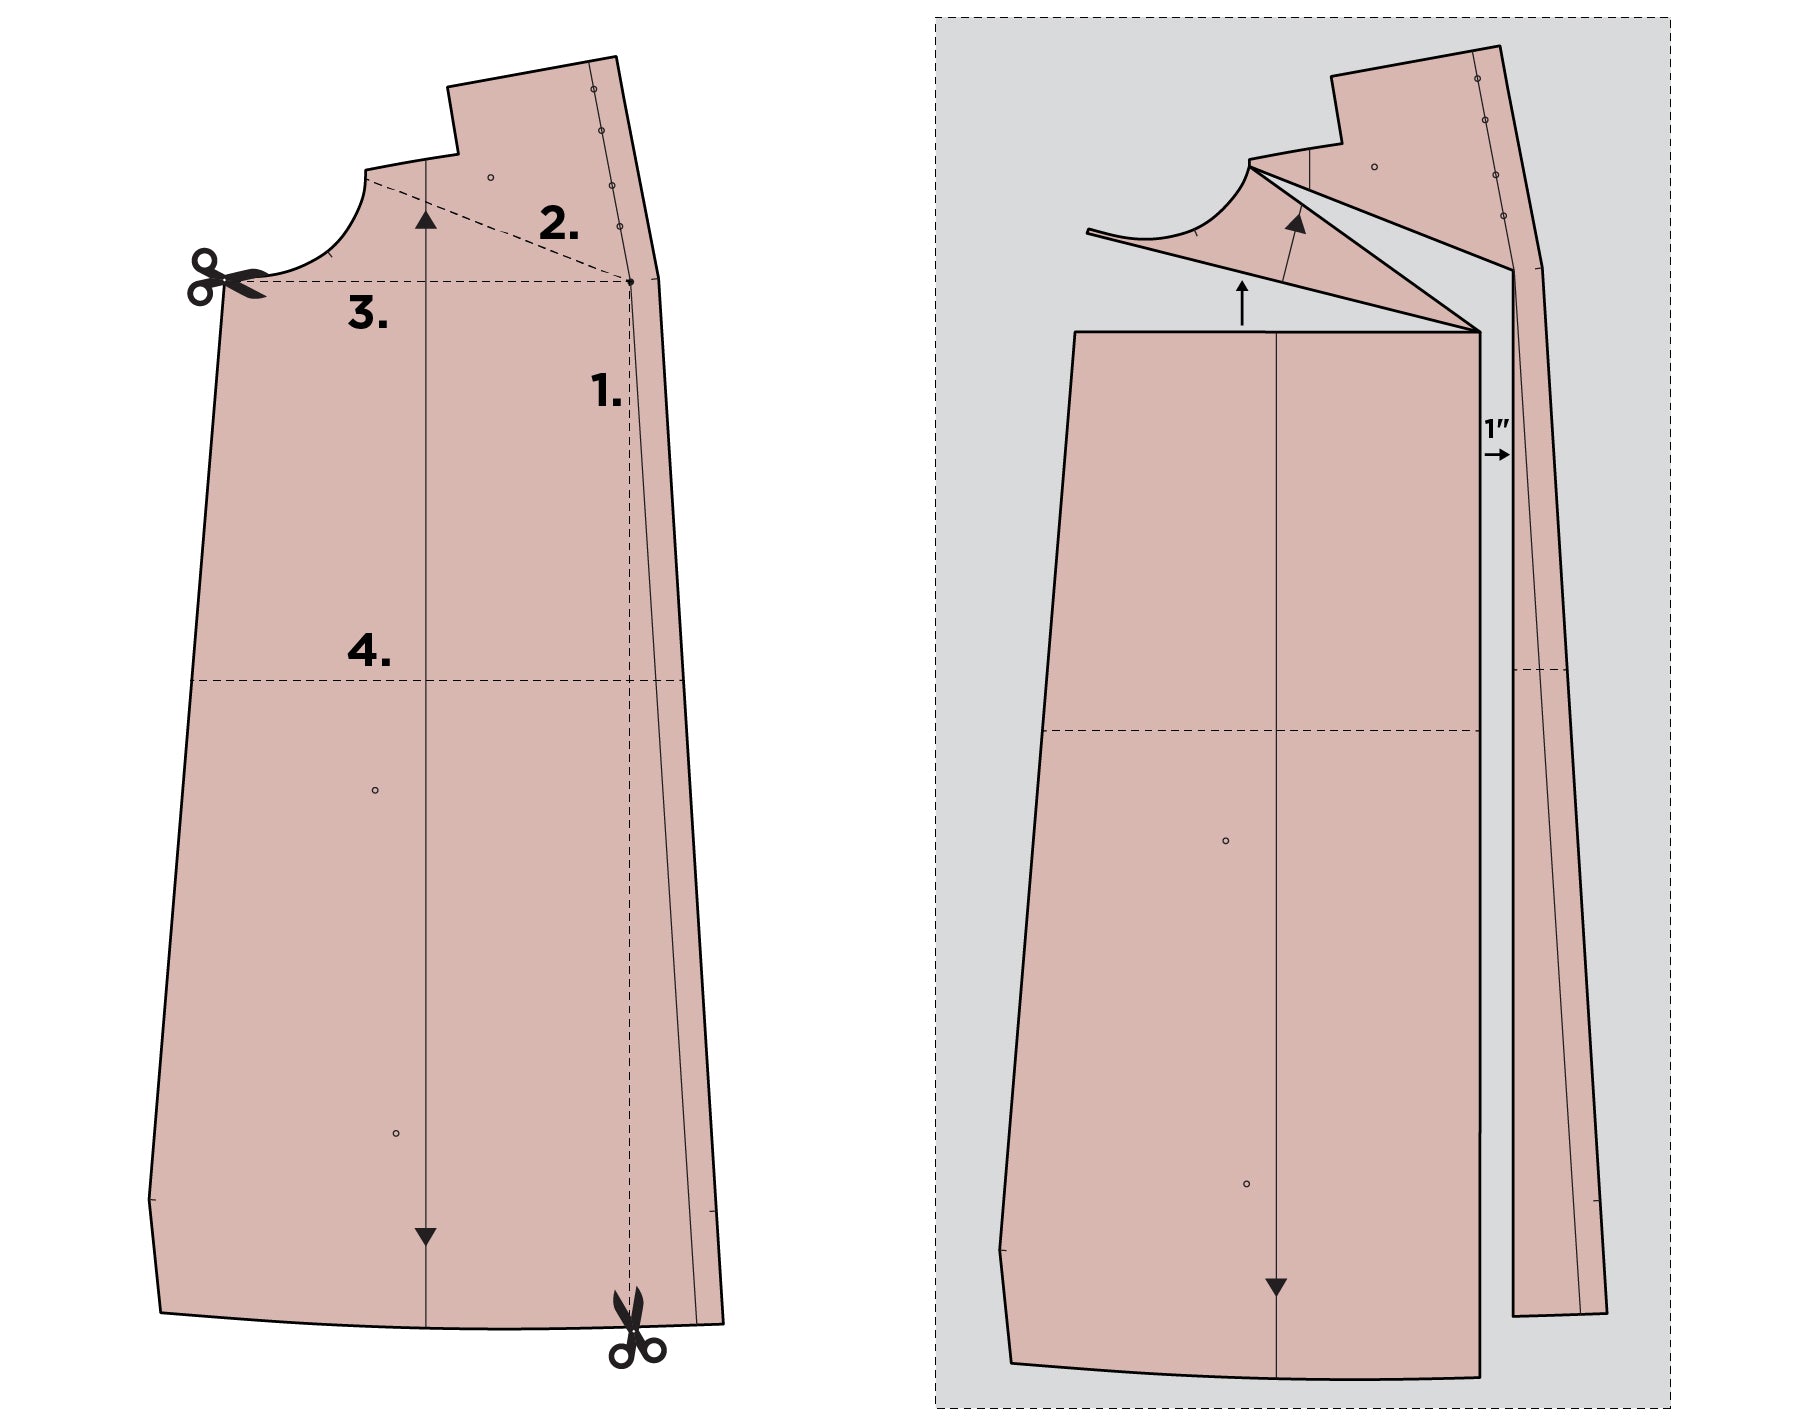
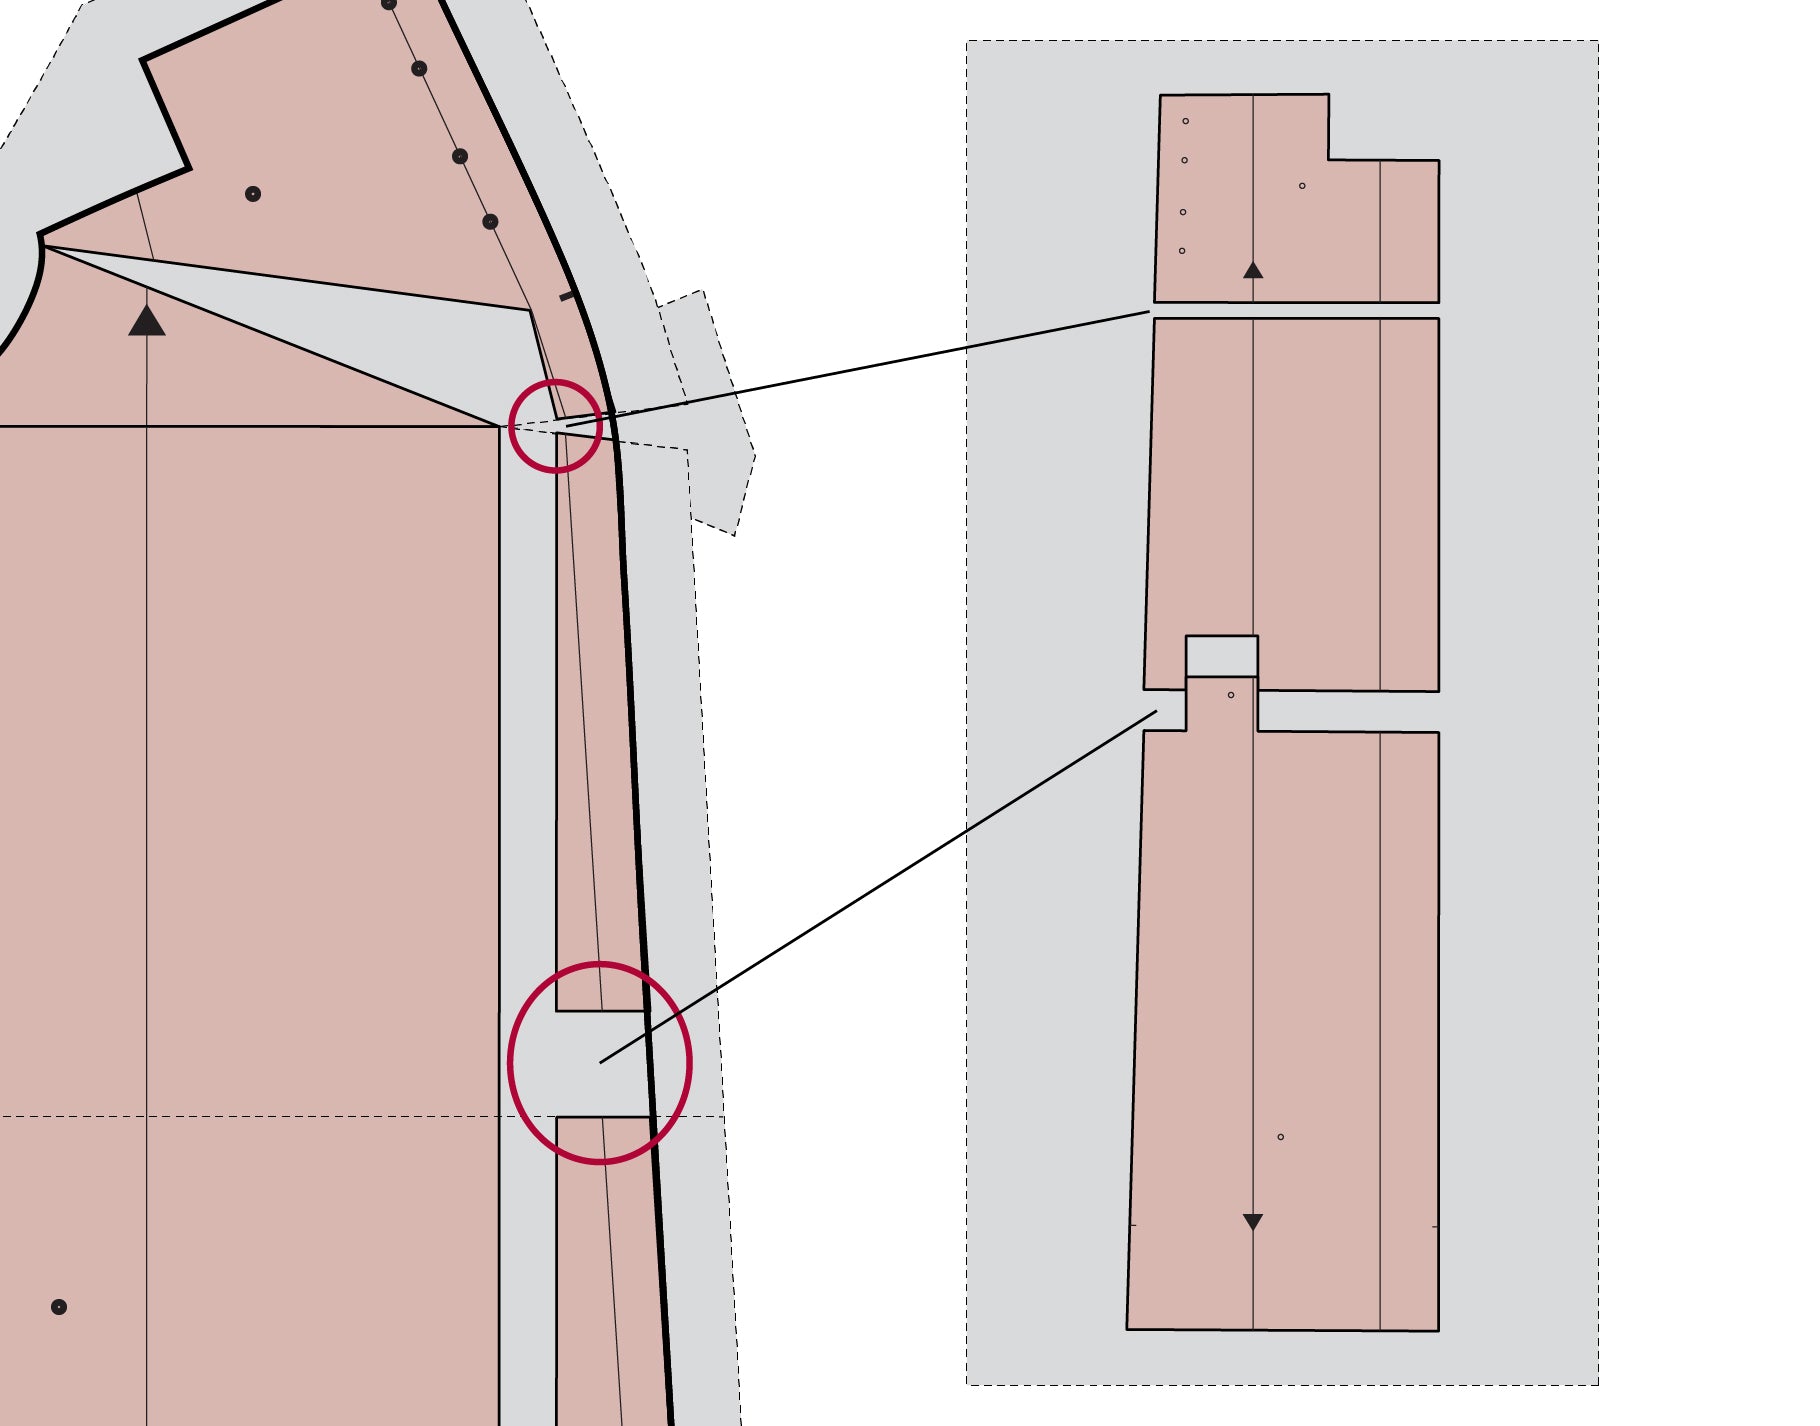
Before I begin I like to mark in the seam allowance along the princess seam along the side front pattern piece.
- Draw a vertical line (1) from the apex down to the hemline of the pattern making sure to keep the line parallel to the CF / grain line.
- From there draw a line connecting the apex to the armscye (2). You'll want this line to measure approximately 1/3 of the total armhole measurement, starting at the underarm intersection.
- Next draw a line from the bust point out to the side seam, perpendicular to the grain line (3).
- Finally you'll need a line through the body of the garment (4). We're using the lengthen / shorten line here because it runs through the pattern without affecting the alignment of the pocket markings.
- These are the lines that, along with the dart, will form the full bust adjustment.
- Slash through the hemline along (line 1) to the bust and up to the armscye (line 2) taking care to cut to, but not through, the pattern at that point. You want to make sure that the two pieces are hinged together. Then now cut from the side seam to the bust point (line 3), again taking care not to cut through the apex point. You want these pieces hinged.
- Now open the vertical slit the amount of your full bust adjustment (1" in our case) making sure that the two edges of the opening are parallel. This will open the space along line 3, creating a dart. We'll remove that later, don't worry.

- On the hinged piece cut along line 4 and lower it to meet where line 4 hits the main piece.
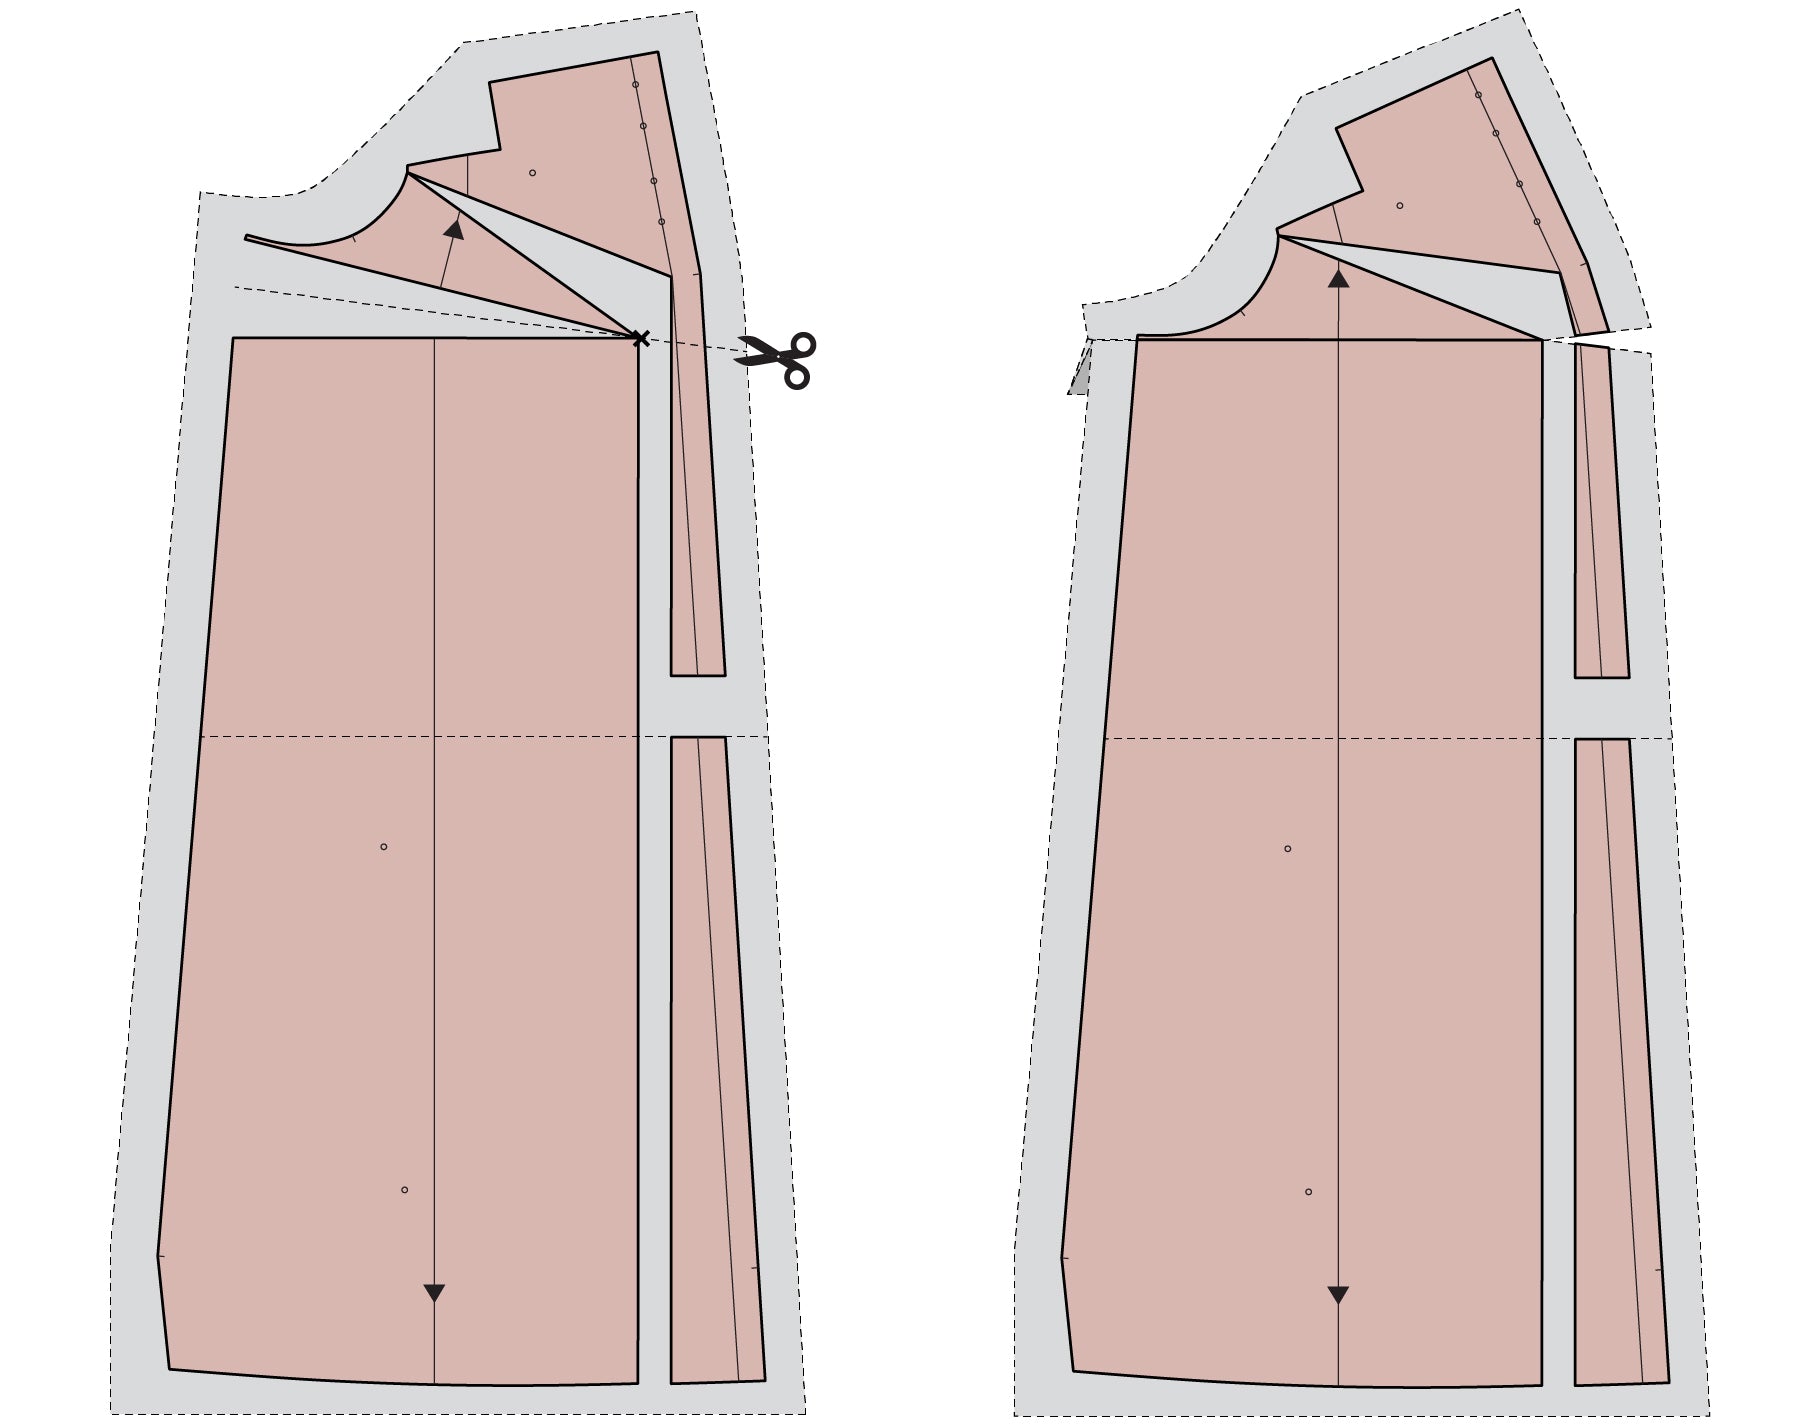
- Cut loosely around the pattern piece, removing the bulk of the extra paper.
- Draw a line from the center of the dart legs, through the bust point, over to the edge of the paper.
- Cut from the scissor icon just to, but not through, the bust point. We want a hinge there.
- Now fold the dart closed. You'll notice the line you just cut opens to enlarge the bust area.

- Now tape a piece of paper behind the space caused by closing the dart.
- Blend along the new princess line of the piece.
- Cut out your new side front pattern piece.
Now we'll need to lengthen the center front so that it sews to the side front properly. To do this:
- Measure the spaces that opened up at the bust and the waist line. Make sure you measure along the seam line! This is very important; as you can see the amount opened at the cut line of the bust is much greater than along the seam line. If you measure the cut line your pieces will not walk.
- Cut along the bust line (through the bust point notch perpendicular to the grain line) and the waist line. Spread the pieces to match your side front measurements.
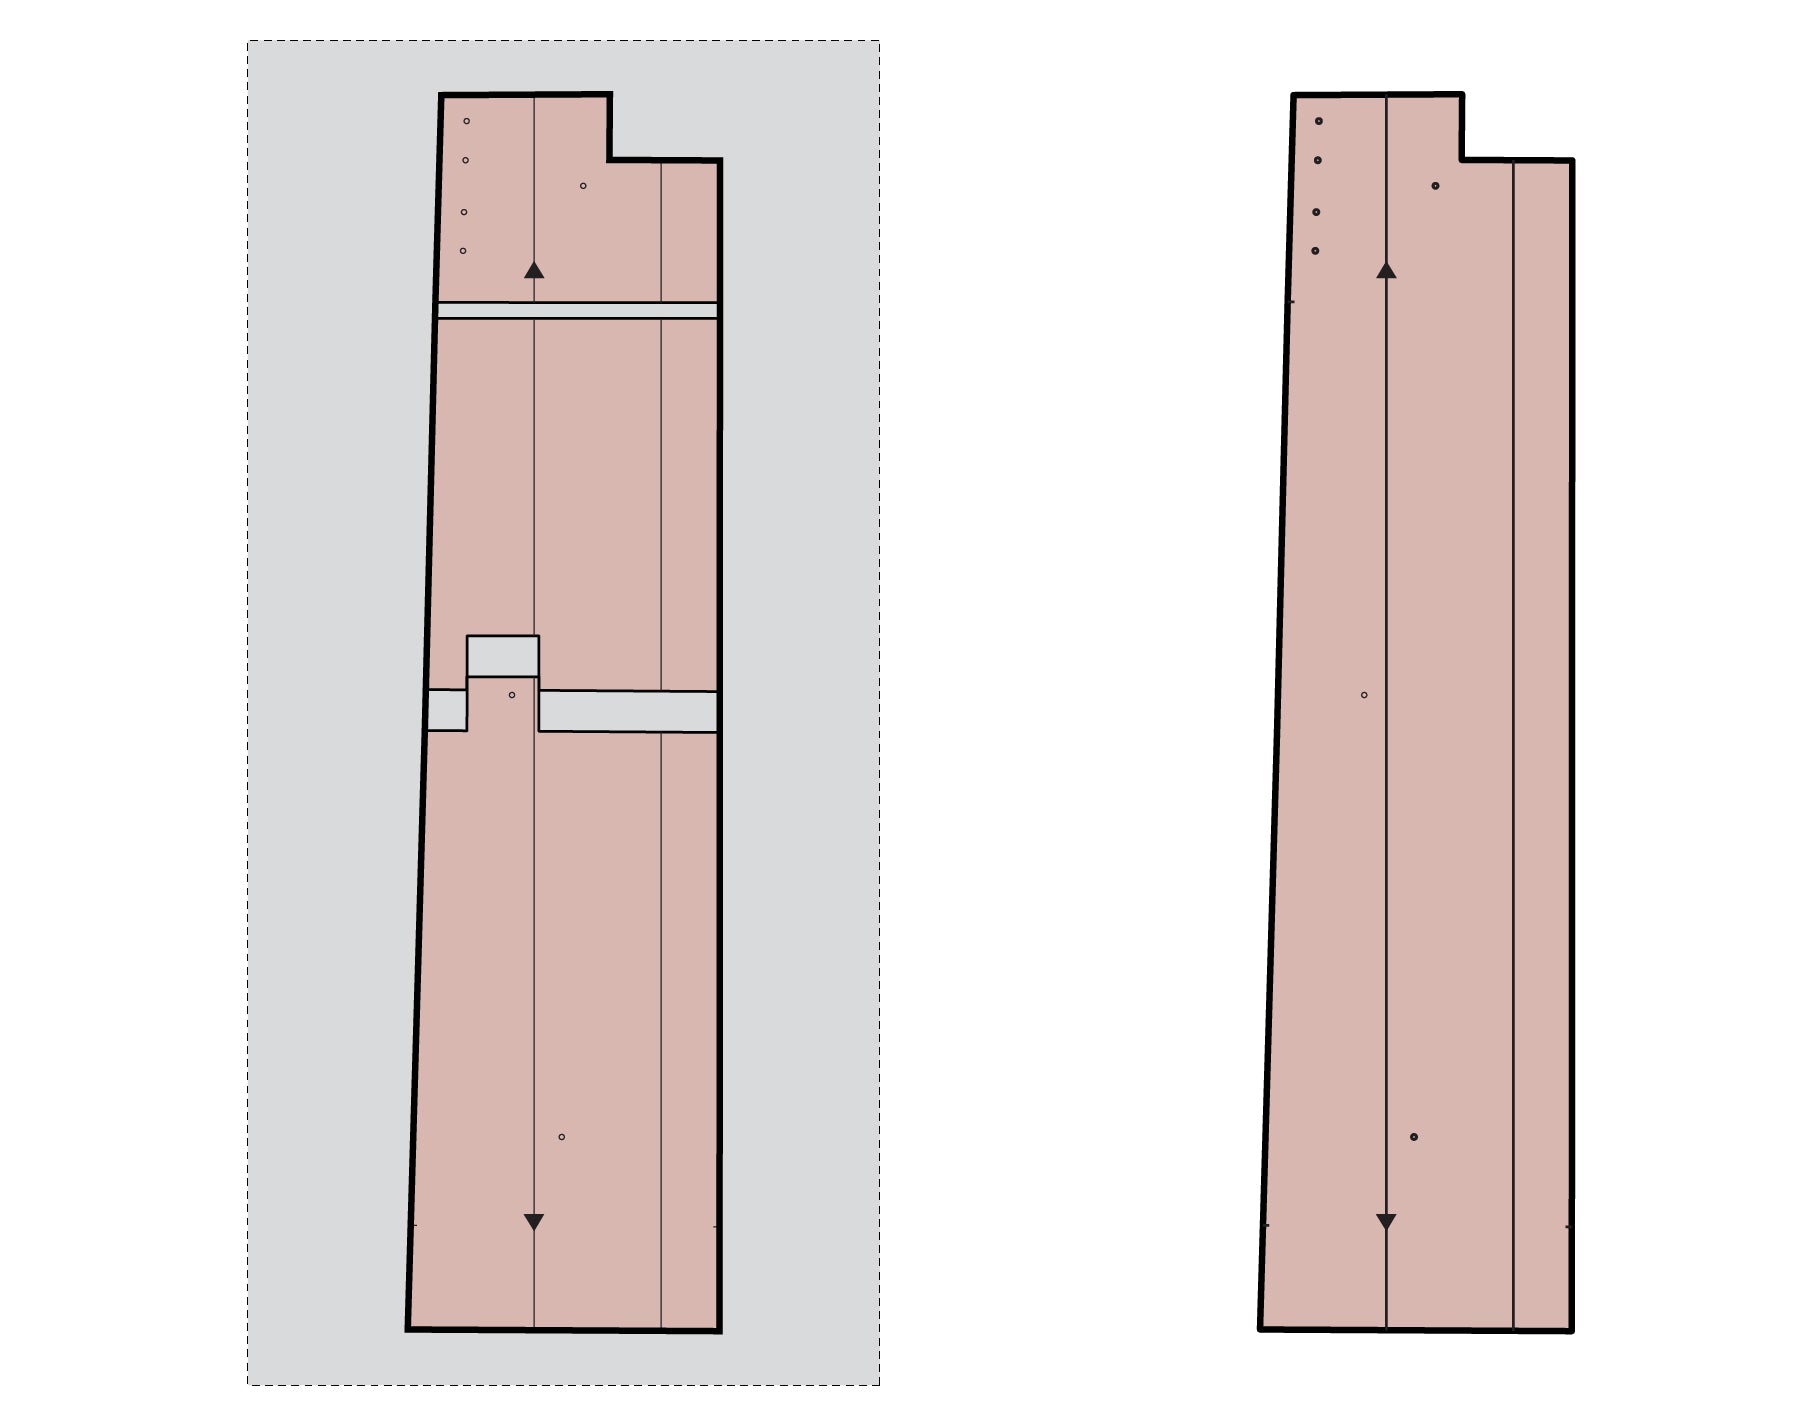
- Now trace along the outer edge of the new pattern piece and cut from your paper. You now have your new pattern piece
Since this pattern has a lining, if you make a bust adjustment to the shell of the pattern you'll need to make an identical one to the lining as well, so keep that in mind.
That's it for our basic pattern adjustments, next up is cutting and sewing!

Featured Products: