Two Ways to Sew Piping into Your Garments

It's no mystery that attention to detail is necessary when it comes to making clothing; clothes that are well-made and long lasting require care during making. After we've sewn a pattern enough times and have the foundational details down pat we get pretty comfortable. Inevitably, this is the moment when most of our mistakes happen! Does this happen to you?
We've found that adding style details to a garment changes things up enough enabling us to maintain focus when we're working with a familiar pattern. These fun elements add unique touches, and they push our skills. Case in point with the piping striped Linden Sweatshirt shown here! It's rare to find a ready to wear garment with this type of design detail.

In today's sewing tutorial, you'll learn how to sew in both wavy and circular piping. Piping is traditionally inserted or sewn along the edges of a garment in self or contrast fabric, but it can be inserted anywhere there is a seam - like the circle shown above. Ready? Grab some fabric, piping, a seam gauge, scissors, a zipper foot, and chalk or a marking tool of your preference. You can use a cording foot if you own one. We chose to use a zipper foot in this tutorial as most machines come with this foot.
Wavy Piping


We're using a washable fabric marker to mark our fabric, but you can use whatever marking tool you prefer. Make sure to test your marking tool on a scrap piece of fabric before you begin to ensure that it will truly wash out. After drawing a wavy line, use a seam gauge to mark out a 1/2 inch (1.27 cm) seam allowance. The top line will be the line you cut along. The bottom line indicates the seam where your piping will be placed.


Pin your piping so that the raw edge of the piping aligns against the raw edge of your cut piece of fabric. If you're adding a second line of piping determine how far apart you want your piping to be. Make sure to factor in seam allowance on both sides. Skip ahead if you're only adding one line of piping.
Our waves of piping are 2 inches (5.08 cm) apart. Using the other half of the previously cut fabric, measure and mark a 1/2 inch (1.27 cm) seam allowance from the raw edge. From that point measure and mark 2 inches (5.08 cm) or whatever distance you choose. Then, measure and mark another 1/2 inch (1.27 cm) so that you have seam allowance to attach your top piece of piping. Repeat these steps to add as many additional lines of piping as you want.
Having everything measured and marked on all pieces of fabric prior to sewing is a good way to proactively catch and fix any errors.

Use a zipper or cording foot to sew on your piping. Sew as close as possible to the encased cording as possible, and you can move your needle position to the far left to enable this.


After sewing on your first line of piping, press the seam allowance down. You'll fold it back up when pinning your seams together in the next step, but pressing now will help the seam lie flat after sewing both pieces together. If you're inserting a second line of piping cut your fabric along the line you've drawn. Pin the additional lines of piping along the raw edge.
You're ready to sew your two pieces of fabric together! Before doing so, you're going to add notches so that your curves meet at the correct points when you're sewing. When you place the pieces of a curved seam right sides together you end up joining a convex and concave curve. As you can see above the pieces don't align neatly on top of one another in the same way that a straight seam does. Adding the notches will help keep everything aligned.


To notch your raw seams, unfold your fabric and place wrong sides together. The curves will line up as they are mirror images when the wrong sides of the fabric are facing one another. Snip notches no more than a 1/4 inch (0.63 cm) deep at periodic intervals along both high and low points of your curves.


Turn your pieces right sides together again, and use the notches you made in the last step to ensure your seams are aligned when pinning. Sew your seams together using your zipper foot and a 1/2 inch (1.27 cm) seam allowance. Remember, you can move your needle to the left to get as close to the piping as possible. Sew slowly following the curve of your fabric being sure to ease when needed.


Press your seam open, and finish as desired. Sew the second line of piping you previously pinned, and press and finish as desired. Continue adding piping or finish sewing your garment.
Circular Piping


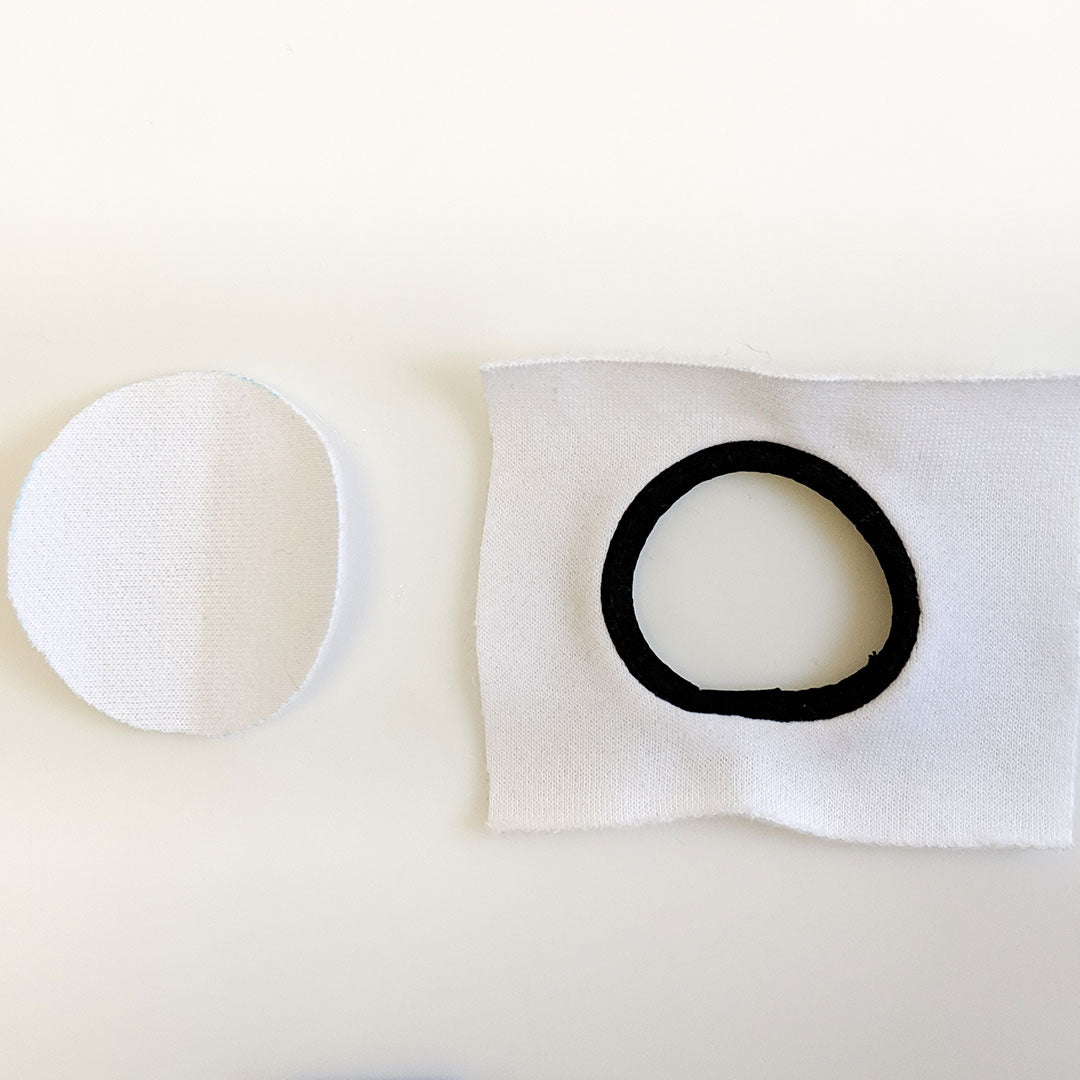
Grab the fabric you plan on inserting your piping into (the piece shown on the left). Trace out the size of the circle, or other squiggly shape, you want to make. Within the circle, measure and mark a 1/2 inch (1.27 cm) seam allowance. This will be the line you cut along. Unless you're planning on making piped cutouts you'll need a second piece of fabric to fill in the empty space that will be created when you insert the piping. Use that piece of fabric to draw a circle that is the same size as the original circle or shape drawn (the piece shown on the right).
Once you have everything drawn, cut out your circles!


Pin your piping so that the raw edge of the piping aligns against the raw edge of your cut fabric. Let the tail end of your piping overlap where you started pinning by 1 inch (2.54 cm) and trim.


Use a seam ripper to carefully unpick the stitching holding the cording in place on the 1 inch (2.54 cm) tail of piping. Once unpicked, spread open the piping and trim the cording by ~ 1 inch (2.54 cm). This will allow you to overlap the beginning and end of your piping smoothly.


Wrap the empty tail piece around the beginning section of pinning. Fold in the short edge of your tail piece by a 1/4 of an inch (0.63 cm) and pin everything in place.
Use a zipper or cording foot to carefully sew on your piping. Move your needle to the far left position in order to sew as closely to the piping, without sewing through it, as possible.

After attaching the piping, press the piping seam down to the wrong side. Flip both piped and insert pieces of fabric over so that the wrong sides of the fabric are facing you. Place your insert circle on top of piping piece, and carefully pin the pieces together. Pin the right side of your insert circle edge to the right side of the seam allowance you previously pressed inwards.


Flip everything over, and double check that you've correctly pinned your fabric pieces together. You should have right sides facing up on both pieces. Make sure everything is pinned smoothly before sewing.
Keeping things right side up fold in the edges of your top most piece to expose your pinned seam. Carefully sew the pieces together easing as needed along the way.

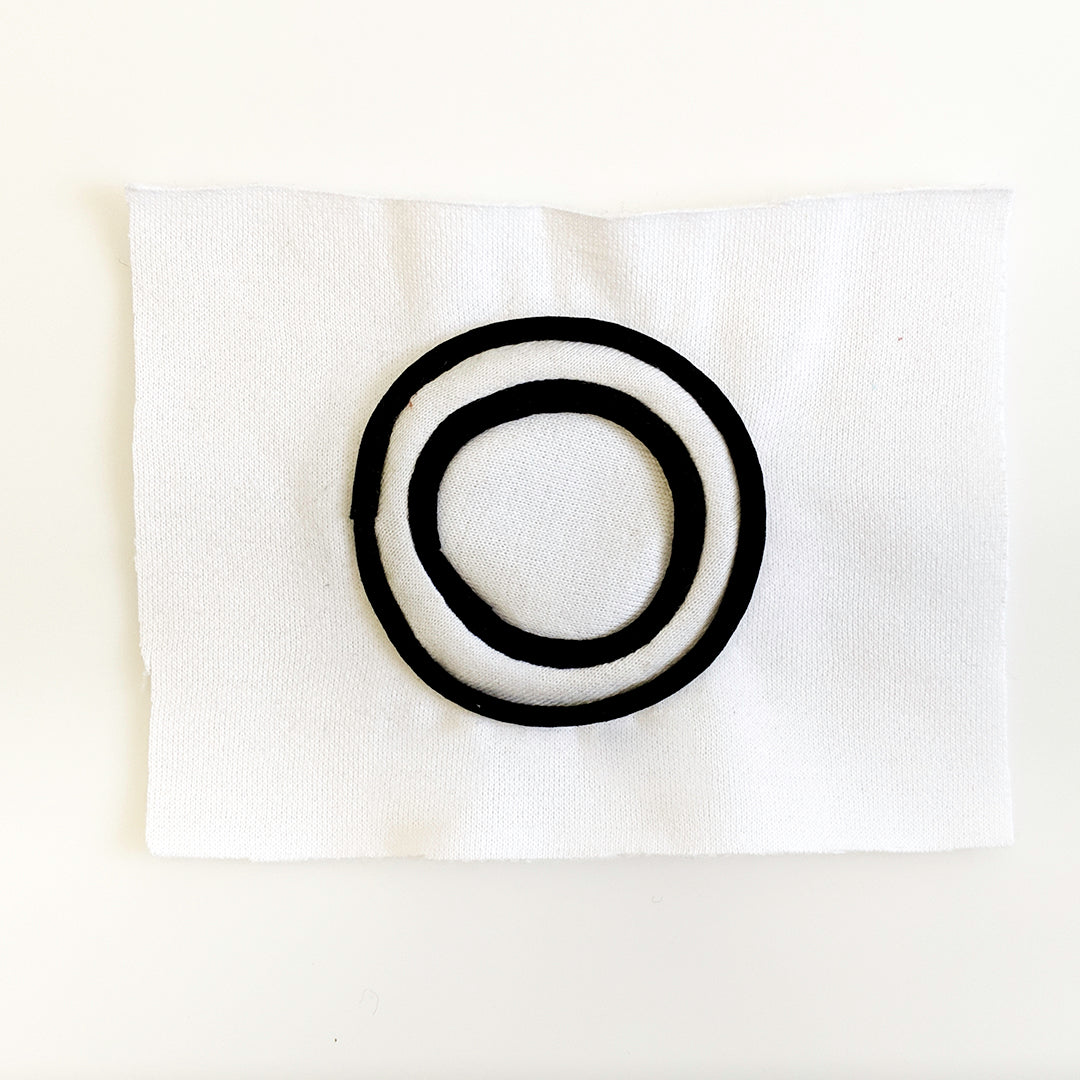
Press your seams open, clip if needed, and finish as desired. Repeat the above steps to create additional circles or concentric shapes! Let us know what you think about details in the comments. What are other features you like to add to your garments to make them stand out?