How to Bag a Jacket Lining

Here it is, my tutorial on how to line a jacket using the 'bagged' method. This jacket lining method gives the most professional results, requires the least amount of hand sewing and is also the quickest. A triple win in my opinion! If you look through your closet, you'll find that almost every jacket you own was lined using some variation of this method. This method is really very simple and hopefully you'll be making jackets right and left now that lining them is so easy! This tutorial is pretty photo heavy, so click the link below to continue to the full post.
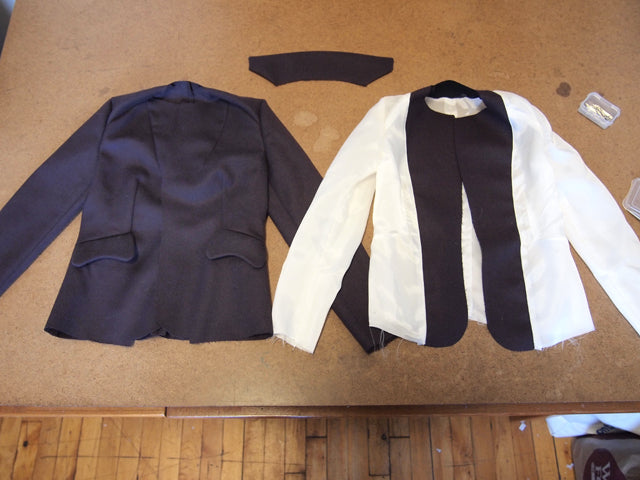
Step 1 : Cut out your pieces like normal. Follow the pattern instructions to sew the shell of the jacket together. Do the same for the lining but when attaching the front facing to the lining leave about 2" unsewn at the bottom edge. Stitch along the sewn edge of the lining securing it to the seam allowance of the facing.


Step 2 : Attach the collar to the neck edge of the jacket. *See note below about this particular collar and a few other notes on this pattern.

Step 3 : With right sides facing, pin and stitch the jacket shell and lining together around the sides and neck leaving the hem loose.

Step 4 : Grade the seam allowance, trim excess from lapel points and clip into the lapel corners.


Step 5 : Understitch the facing from the hem to the breakpoint of the jacket. The breakpoint is the point at which the lapels turn outward.

Step 6 : Align the hems of the shell and the lining and stitch together from one edge to the other. You will notice this will cause some gapping between the edges of the lining and facing, this is what will create the pleat.


Step 7 : Now it's time to attach the sleeve and lining together. I find it's helpful to lay the jacket out in an arrangement similar to this to prevent the sleeve linings from becoming twisted during this next step.

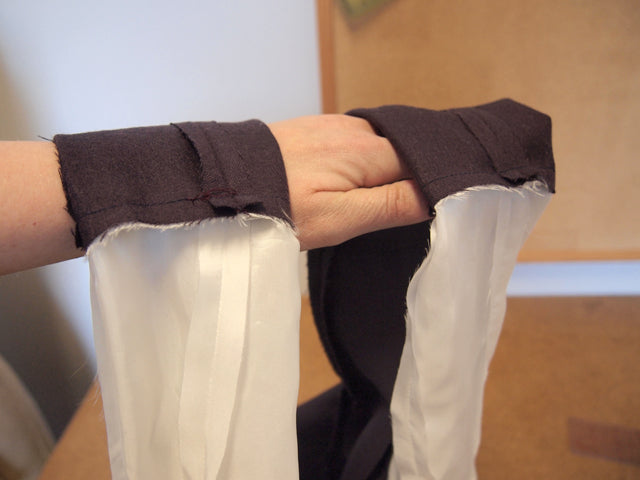
Step 8 : Turn the edges of the sleeve lining up about 2". Insert the cuffed lining into the sleeve matching seams and making sure neither the jacket nor lining is twisted. Stitch the two layers together and repeat for the other side.


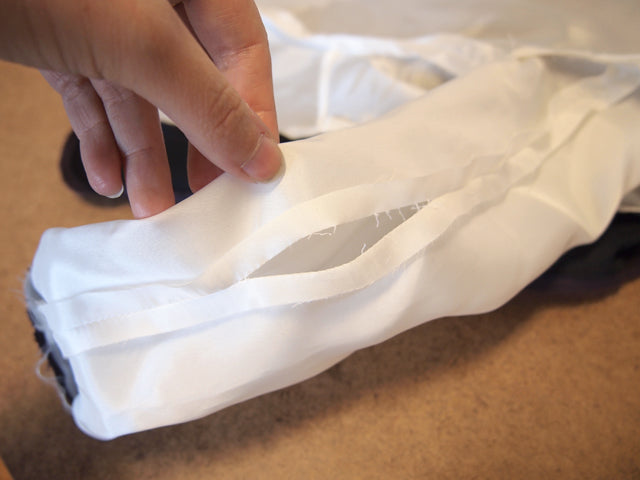
Step 9 : Since your jacket is now completely sealed up in this strange configuration you will need to slit an opening in one of the underarm seams. I recommend 8-12" depending on the size and bulk of your jacket. You could potentially just not sew this part, but by sewing and then re-opening you get a really nice pressed line on which to sew it back up later.

Step 10 : Now to turn the jacket, just start pulling the jacket through the hole in the sleeve you just created until the whole thing is right side out.


Step 11 : This next step is totally optional and just something I like to do to keep the lining from sliding all over at the armholes. Reach in through the hole in the sleeve lining and grab the underarm seams from both the shell and the lining and bring them out through the hole. Chain a length between the two, probably around 1.5" for a full sized jacket. Repeat with the other arm.


Step 12 : To sew up the hole in the arm, pin the two layers together and stitch as close to the edge as you possibly can.


Step 13 : Press around the outside of the jacket and sleeve hems. When pressing the lapel, start from the hem and roll the seam to the inside of the garment until you hit the breakpoint and then start rolling the hem towards the outside of the garment. This will insure that you won't be able to see the seam.

Step 14 : You will notice that lining a jacket with this technique creates a little opening where the hem pleat and facing meet. This is simply a result of this technique and you can stitch this closed with no ill consequences.


That's it, you're done! Wear your jacket around and revel in how easy that lining was!

* A little note about the collar and pattern. For this tutorial I printed out BurdaStyle's Jorinde pattern at 60% . I originally thought that the really strange collar on this coat was some sort of style decision but after realized that this blazer collar is really just a traditional notched lapel which was sewn wrong for their sample. The point of telling you this is so that you do not follow this tutorial as a guide to doing a notched collar! The other thing that drove me crazy with this pattern is that the lining is not larger than the shell and has no back pleat. Typically you want the lining larger to allow for movement and prevent tearing. I don't own a single store bought blazer or jacket (even cheap ones) with a lining that is not larger than the shell and they all include back pleats. Oh well, it's just a tiny blazer anyway but I wanted to give you a heads up!
