Madewell Scout Variation: Pattern Tutorial
As promised, here is the first tutorial in making the Scout Tee Madewell variation. I broke this down into two sections because it was getting pretty long as one post. For this variation tutorial you will need the following things...
- Scout Tee Pattern
- Rulers (straight and curved)
- Pencil
- Paper
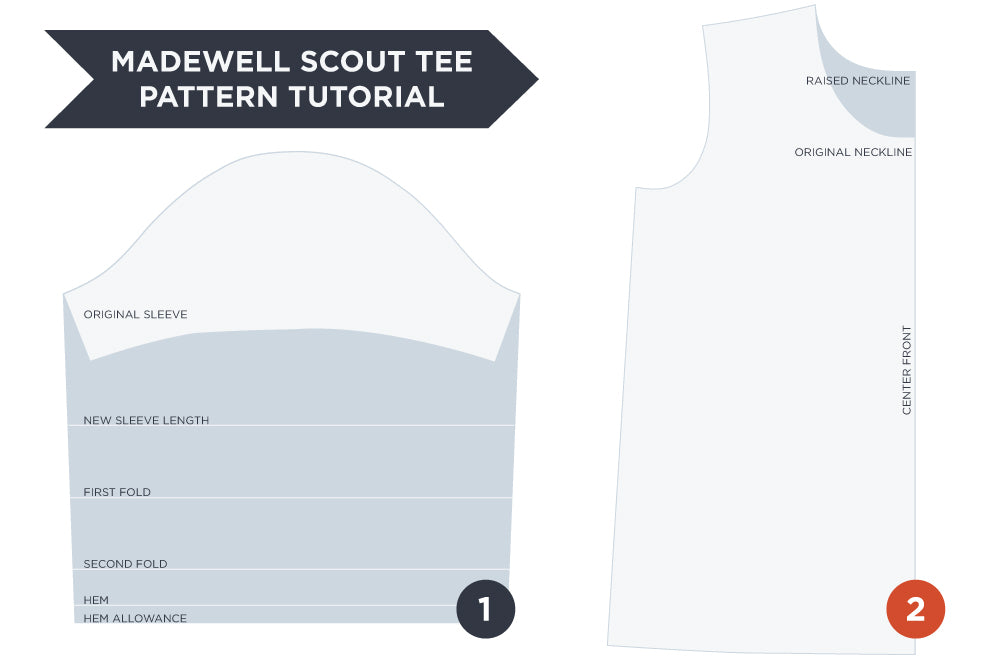
- You're going to need to first lengthen the sleeve. Decide how long you want your finished sleeve to be, this will be the length from the sleeve cap to the first line in the illustration above, new sleeve length.
- Decide how wide you want your cuffs to be, mine are 1.5" wide. Measure down that distance from the new sleeve length line, this is the first fold line. Measure down the same distance again to create the second fold line. This is your cuff.
- Now to create the hem measure down 1/2" from the second fold line. This will fold to the underside of the cuff, ensuring the cuff has no stitching lines.
- From there measure down another 1/4" hem seam allowance which you will fold under while hemming the sleeve.
- The width of the bottom of my cuff is 16" including seam allowance.
- For the center front piece we're going to need to create a new neckline. Raise the front of the neckline to the desired height, I raised mine 2.5" then reblend the neckline.
- Measure down from the center front neckline to the point you'd like the opening to start, mine was 5.5" down.
- Next measure over from the center front neckline 3/4" and connect that point with the point you marked in the above step to create the neckline wedge. Add 1/4" seam allowance to the line you just drew.
- Curve the hem of the shirt, I marked a point 2' up from the bottom edge of the side seam and blended to the center front.
- Do the same to the hem of the center back pattern piece so that both the front and back have a curved hem.