As promised in our last post today I have instructions on how to make your own Hemlock pattern with side splits! It's really very easy so you'll have one of your own in no time. For this tutorial you'll need the Hemlock pattern, which you can get by signing up for our newsletter in the sidebar. Lets get started!

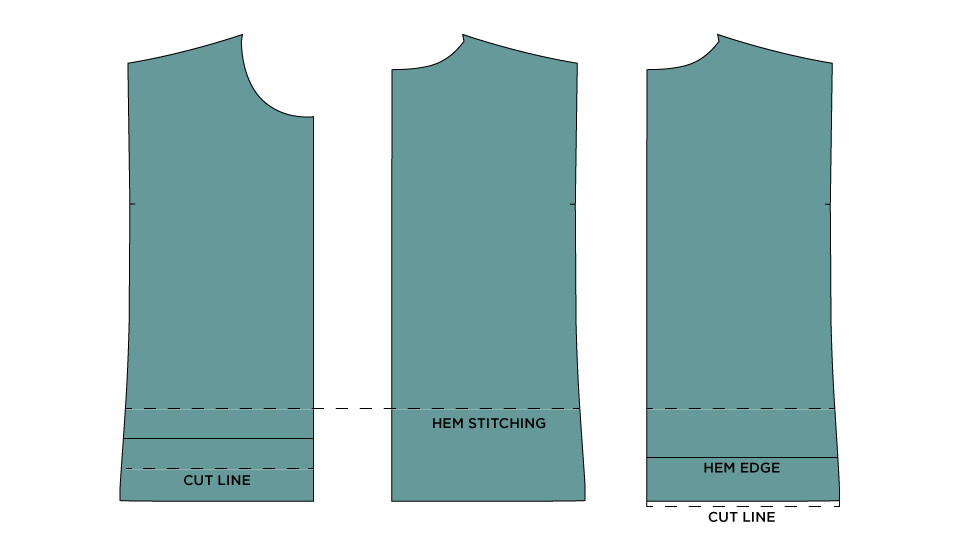
Begin by deciding where you want the front hem edge to hit. I shortened my top by 3". Now you'll need to decide how deep to make the front hem. this is the amount from the hem to the stitching line above it securing the hem in place - mine is 1 1/2". Measure from the hem edge down 1 1/2" (or the amount you chose if different). This is your cut edge. Do not cut away the excess just yet.

Align the hem edges of the front and back pattern pieces and extend the stitching line over from the front to the back of the pattern. By doing this first you'll ensure that your stitching line is straight across the hem of the top. Choose the depth you'd like for the back hem, mine is 2 1/2". Measure down 2 1/2" (or the amount you've chosen if different from this example) from the stitching line you just marked to create the hem edge. Then measure down the same amount again to mark the cut edge. You can see in my example above that I needed to extend the edges of the top slightly. If you need to do this as well simply extend the side seams to hit the cut line.

Cut out your pieces and trim away the excess below the cut line. Cut your pattern as instructed in the pattern.

With the right side of the piece facing up, fold up the lower edge of the front along the hem edge line established on the pattern.

Stitch or serge along the two edges of the fold.

Turn the folded edge right side out and give it a press, just on the sewn part, don't press the unsewn side seam. Assemble the shoulder seams and attach the sleeves as written in the pattern. Repeat for the back of the top.


With right sides facing each other, align the side seam edge making sure that the two raw edges of the hems meet. Sew along the side seam stopping exactly at this point. Repeat for the other side.

Now you'll need to hem around the top. I used my coverstitch machine to do this so that the raw edge is completely enclosed in the stitching, but a twin needle would work just fine. Starting at one edge stitch around the top anchoring the raw edge of the hem in place.

Here's a closer photo of what your hem will look like when you're completed with this step. Hem the sleeves as indicated in the instructions, add the neckband, and you're done!


