Felix Sew-Along: Advanced Pattern Adjustments
Shop this post

Felix Dress
Today we’re going to build on the basic Felix pattern adjustments we shared on Monday and show you how to easily raise the V-neckline and do a small or full bust adjustment. If you need to recap on our basic pattern adjustments, you can find that post here. Now let’s dive in!
Length Adjustment Method 1
There are a few ways to lengthen or shorten the bodice which will also result in a lowered or raised neckline. The first one is shortening the bodice above the V placement but below the armhole.

To begin, choose a place above the V but below the armhole on your pattern. Draw a line across the pattern perpendicular to the center front line.

Cut across the pattern along this line. You’ll now either spread or overlap the pieces depending on whether you want to lengthen or shorten the pattern piece. We’ll be shortening it here so we’re overlapping our pattern pieces.

Blend along the side seam and front neckline to smooth the jagged edges created when you adjusted the pieces. This is your new pattern piece. You’ll want to perform this same adjustment to the other front, the back bodice, and both neckband pieces. Walk the seam lines of your new pattern pieces to make sure your adjustments were uniform throughout the different pattern pieces and if they match, you’re good to cut your new pattern pieces from fabric!
Length Adjustment Method 2
The second way that you can adjust the bodice length is through the armhole and neckline. This will raise the armhole as well as the neckline so if you feel that you need to raise your armhole this is a great choice.

To begin this adjustment place a line through the armhole above the notch perpendicular to center front.

Cut across the pattern along this line. Same as we did above, you’ll now either spread or overlap the pieces depending on whether you want to lengthen or shorten the pattern piece. We’ll be shortening it here so we’re overlapping our pattern pieces.

Blend along the side seam and front neckline to smooth the jagged edges created when you adjusted the pieces. This is your new pattern piece. You’ll want to perform this same adjustment to the other front, the back bodice, and both neckband pieces. Additionally since we went through the armhole, we’ll need to adjust our sleeve cap.

The sleeve cap adjustment is the same no matter which sleeve you’re using, but we’re showing you on the flutter sleeve since it’s possibly a shape people are less used to looking at. To begin, draw a line perpendicular to the grain line above the front and back notches. You can eyeball this or measure along the seam line of the armhole and sleeve cap, but you want this line to more or less correspond to the point you cut on the bodice.
From there, cut across the line and overlap the pieces the same amount you took out of your bodice (or added if you were lengthening).
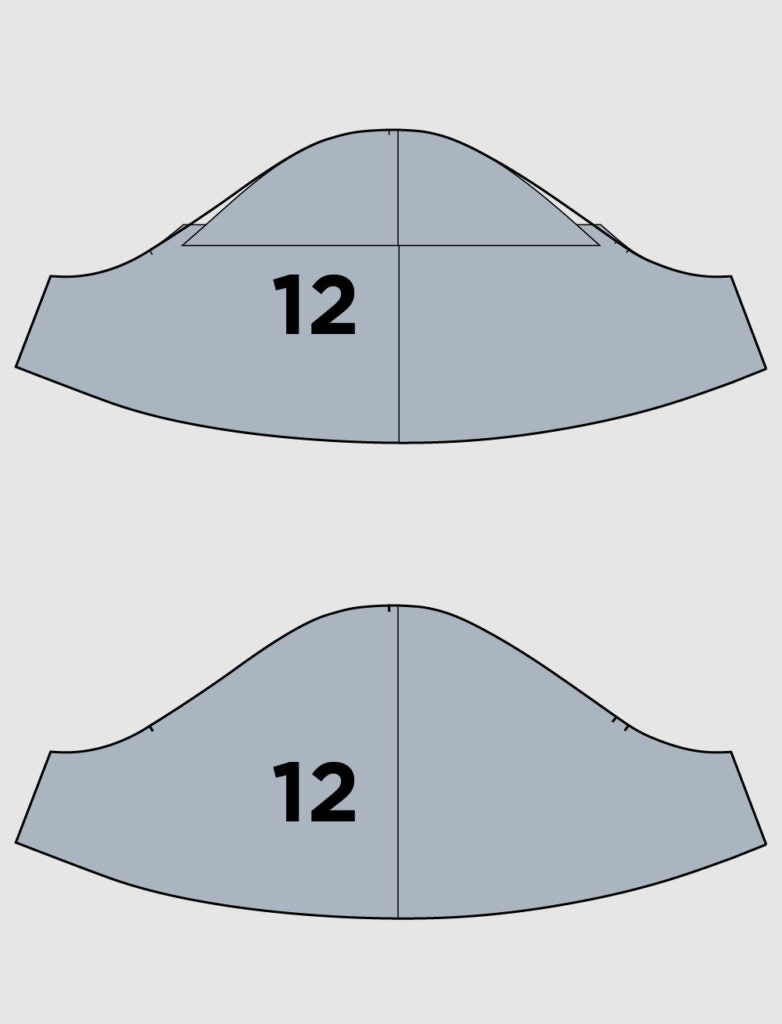
You’ll now blend the sleeve cap as shown above, between the notches and the top of the sleeve. Walk your new sleeve with the armhole of the bodice to make sure you’re adjustments were precise and make adjustments if needed.
Length Adjustment Method 3
If the bodice is the proper length for your torso but you’d still like to raise the v, this is an easy method to do so that doesn’t involve pattern drafting. It’s a combination of the methods we’ve used to lengthen and shorten the bodice and is relatively quick and easy.

Note how much you want to raise the V. Split this amount in half and use that measurement shorten the bodice through both the armhole and side seam. Then cut along the lengthen / shorten line printed on your pattern and lengthen the pattern the full amount that you shortened the top half.

Blend the side seam and neckline to smooth the jagged edges you created by adjusting the length.

This is your new pattern piece! Note that you’ve raised the armhole by following this method. If you do need your armhole lower, you can trace the original armhole onto this piece, or simply lower it the amount you feel you need for your body. You’ll need to make these same adjustments to the other front, the back bodice, both necklines, and, if you keep the raised armhole, the sleeve. Walk your seam lines after these adjustments are complete to make sure you’ve done the same adjustment to each pattern piece, and if all aligns you’re free to cut your fabric. This might be a great place to do another muslin though to check the adjusted fit.
Full & Small Bust Adjustments
Now lets talk Full Bust Adjustments. The Felix is drafted for a B cup (like all our patterns) so if you’re a C you may be able to get away without a FBA. If you’d like to do a small bust adjustment you would do the opposite of what I’m showing here. This is the same as any other dartless F(S)BA so if you have a method you use that works well for you, go ahead and use that.
The first thing you need to do before you start your full bust adjustment is to figure out how much of an adjustment you’ll need. To begin you’ll need your upper bust measurement and your full bust measurement. Once you have those you’ll subtract your upper bust from your full bust. If the number you get when you subtract your upper bust from your full bust (the total adjustment) is over 2″ (B cup) you may need a full bust adjustment, whereas if the number you get is 2″.
To start I prefer to tape the upper and lower pattern pieces together along the stitching line so that you’re performing the adjustments on one piece rather than two. You can definitely adjust the top and then spread the bottom piece to match the added width though, it’s just what you find works for you.

Usually when working with a full front that’s seamed such as the Farrow or Yates I like to tape the two pieces together and work the bust adjustment as one piece. In the case of the Felix since the skirt is gathered, we’re going to work on just the bodice. Since the skirt is eased in we’ll measure it at the end to see if we want or need to add extra width to it.
Locate the apex of your bust and mark. We highly recommend making a muslin to mark your exact apex for the most exact adjustment. Everyone’s apex falls at a different place and the only exact way to find it is to try the garment on and mark it yourself. If you followed along with our previous Felix post and made a muslin, you’ll have this point already.
Draw a line from the apex out to the side seam. Next you’re going to draw a vertical line from the apex down to the hemline of the pattern piece making sure to keep the line parallel to the CF / grain line. From there draw a line connecting the apex to the approximate center of the armscye. These are the lines that will form the full bust adjustment.

Slash through the hemline to the bust and up to the armscye taking care to cut to, but not through, the pattern at that point. You want to make sure that the two pieces are hinged together. Then slice through the line connecting the side seam to the apex, taking care to not cut through the apex point, you want the pieces hinged. You’ll then open the vertical slit the amount of your full bust adjustment making sure that the two edges of the opening are parallel.

You’ll notice that when you move the side out for the adjustment it becomes longer than the stationary part of the pattern. Use the lengthen / shorten lines printed on the pattern to realign the pattern piece. Cut along this line and lower the newly freed piece so that it’s even with the lengthen / shorten lines on the outer section.

This method of adjustment results in a dart being formed. Fold the dart legs together bringing the lower dart leg up to meet the upper, and re-blend the side seam. I like to score the bottom dart leg and center line lightly with an awl to help the pattern fold right where you want it to on the first try.

You can either cut across the side seam / dart or mark it with a pattern tracing wheel and cut when the dart is open. This is your new right front bodice piece.

Rather than doing the same thing to the left front bodice, trace out a copy of the right front onto a piece of paper. Lay the left front bodice piece on top of it (the pattern piece will be upside down) and align the shoulders. Trace the center angled line onto the paper and extend it to meet the lower edge of the bodice.

Cut the pattern piece out and flip so that the right side is facing up. You now have adjusted pieces for the right and left fronts. Keep in mind that since we lengthened the front bodices you’ll need to make the same length adjustment to the right neckband and the back bodice. You’ll also need to make a width adjustment to the front skirt lining if you’re using that piece.

Depending on the size of your bust adjustment you may need to adjust the front skirt piece. If you did a small bust adjustment I do recommend making the front skirt a bit narrower since you may have trouble easing the skirt into the bodice. If you did a full bust adjustment you can measure the waist seam lines of the bodice and skirt and make a call on whether you want or need to add more fullness. If you do want to add, draw a line parallel to the center front in approximately the same place that the vertical line of your bust adjustment fell on piece 1.

Now spread the two pattern pieces keeping the hem level. The amount you spread will either be the amount your bodice spread or slightly less if you want the skirt less full. You do need to make sure that your skirt waistline doesn’t end up smaller than the bodice waistline seam, but that’s the main consideration here.

Now blend across the waistline of the skirt and you have your new front skirt pattern piece. Your bust adjustment is complete!
That’s it for pattern adjustments, I hope you found this information useful. If you have any questions just let us know below, otherwise we’ll be back Friday for cutting and fusing!
Featured Products: