Tamarack: Setting Snaps
Shop this post

Tamarack Jacket

Tamarack Jacket

Tamarack Hood, Collar, & Patch Pocket Add-On

Tamarack Quilting Design Sheets

The last step in your Tamarack jacket is adding the closure. There are a few different options you can use for this. Buttons, sew in snaps, or you can set snaps. We’re going to show you the latter in this tutorial since we’ve gotten a lot of questions about the process. This is the quick and easy method using the tool included with your snaps. There are many other ways to set snaps involving a press and such but this way works great and doesn’t require extra tools.
You can view the snaps, and everything else we used for our jacket, in this Tamarack Supplies post.
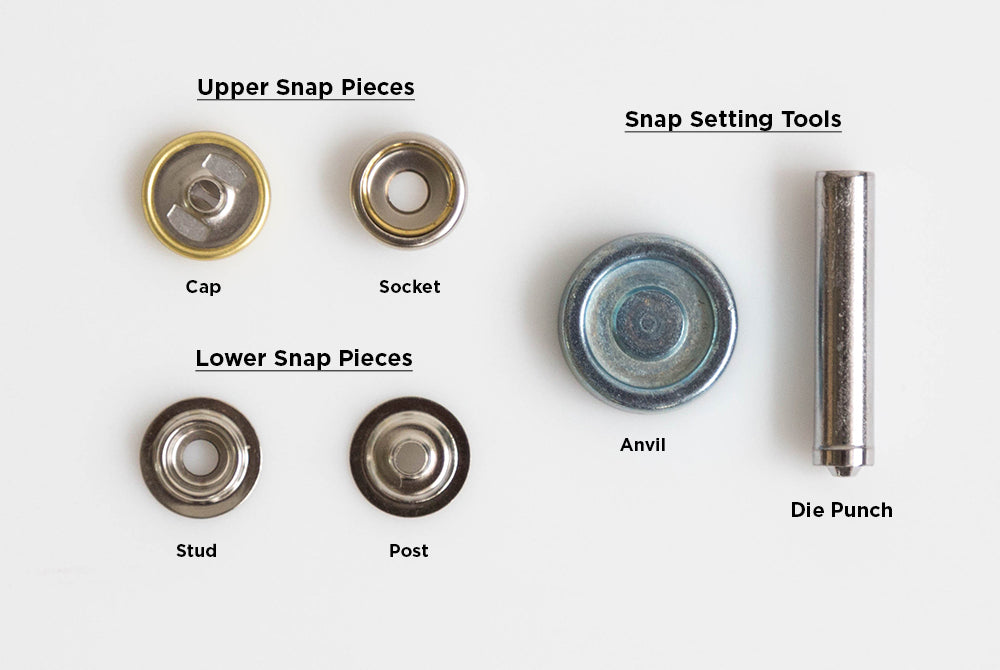
Your snaps will come with 4 different snap parts and two tool pieces. The 4 snap parts are on the left of this photo and the tools are on the right.
In the top row you have the snap pieces that will go onto the outer layer of the jacket when the jacket is closed. To the left is the outer piece – the cap – this is the part you see when the jacket is closed. On the right is the piece that attaches to the other side of the fabric. This – the socket – is the female part of the snap.
In the bottom row are the snap pieces that will go onto the lower layer of the jacket when closed. To the left again is the piece that will be facing up and attaches to the right side of the jacket, called the stud. This is also the male part of the snap. To the left is the back of the snap – the post. This holds the male part of the snap on.
The round flat tool is called the anvil and has two sides, a flat one for setting the upper half of the snap, and the side shown above for setting the lower half of the snap. The long tool is a die punch, it’s what you’ll hit with a hammer to secure the two pieces of the snap around the fabric.

You’ll need to decide on your closure placement. We’ve included a guide in the pattern which you can use, but in some cases you might want to come up with your own placement. With this jacket I’ve decided to place the snaps at the top corner of the quilted lines, I think it looks nicer than the way they fall with the placement guide because of the way I quilted this particular jacket.

Once you’ve decide on your snap placement you’ll need to mark it onto the jacket. I use chalk and a ruler to do this, that way if things aren’t quite right you can always brush it away and start over with marking.

You’ll now need to make a small hole in your jacket, just large enough for the snap shank to fit through. You can easily use a scissor to do this, and I know I said “no extra tools!” above, but I do use this small screw punch for this part. This is the tool I also use to mark dart points and other match points on my paper patterns so it’s really a useful tool. It’s actually a book binding tool but I find it absolutely indispensable for my pattern work.
I’ll be demo-ing snap insertion on this small quilted scrap because it’s easier to see what I’m doing than on the large jacket.

With the right side facing up, slip the shank of the cap into the hole you cut.

- With the cap shank still in the hole, flip the jacket to the wrong side.
- Place the socket over the shank of the cap.
- Turn the anvil so that the smooth side is facing up. Place the snap cap into the anvil.
- Align the die punch over the socket so that the grooves of the two pieces match Hammer the top of the punch to secure the snap in place.

The inside of your snap will look like this when properly secured. Now it’s time to move onto the second side.
Transfer the placement of the snaps you just set over to the other side of the coat. Punch holes at the placement markings.

- Place the shank of the post through the hole from the wrong side to the right.
- Flip the jacket right side up with the shank still through the hole.
- Align the stud over the post.
- Place the snap into the raised side of the anvil. The shape of the post will align perfectly with the inset in the anvil
- Align the die punch over the stud so that the grooves of the two pieces match. Hammer the top of the punch to secure the snap in place.


Once set both sides of your snaps will look like the above images.

That’s it to setting snaps. Like welt pockets, they’re kind of intimidating because you’re cutting a hole in your almost finished garment, but as you can see there’s no need to be worried. We do recommend setting one complete snap on a scrap before attacking your jacket, just to get a handle on all the pieces involved.
Hope you found this tutorial useful and enjoyed the Tamarack Sew-Along!
Featured Products: