Yates Sew-Along: Pattern Adjustments
Shop this post

Yates Coat
Today in the Yates Sew-Along we're going to discuss a few common pattern adjustments. We'll start with blending between sizes, cover lengthening or shortening your pattern, and then talk about full and small bust adjustments. This is also our recommended order for adjustments if you need to do more than one. With that, let's dive in!
Blending Between Sizes

For this example we’re going to continue with the measurements from yesterday’s finding your size post so that you can see what those measurements look like in action. As mentioned previously I’ll be disregarding my waist measurement so I’m blending from a 6 at the bust to an 8 at the hips. You’ll want to blend between the bust and hip (around the waist area) rather than from the bust to the hip because you don’t want to affect the measurements at those points, just the area between them. This is easy for pieces like the lining and front facing because they run the full length of the garment. For the fronts and backs the easiest way to smoothly blend since they’re cut into two pieces is to lay one on top of the other at the seam line. Blend along the side seam and then split the pattern back apart.
You’ll want to make the same blending adjustment to any pattern pieces that cross the point at which you blended. This means if you blend across the waist you’ll need to adjust the upper and lower fronts, the upper and lower backs, the lining and the center front facing. For pieces that only attach to the garment above or below the blending point you’ll use the size they’re attaching to. So for this example I’d cut a size 6 collar and sleeves, but a size 8 in my hem facings.
Lengthening and Shortening
Lengthening and shortening your pattern pieces is pretty straighforward, find the lengthen / shorten lines and apply your length changes between them. In the case of the Yates we’ve included a lengthen / shorten line both on the torso of the pattern as well as the lower pattern pieces, this way you can adjust and keep your proportions. If you have a long or short torso you may want to only adjust the upper portion. Maybe your torso fits great but you have long legs. In that case you’d want to adjust the lower portion of the coat. If you’re proportioned evenly but are just taller or shorter than the pattern is drafted (5’5″) then we recommend splitting the amount you need to adjust between the upper and lower adjustment lines.
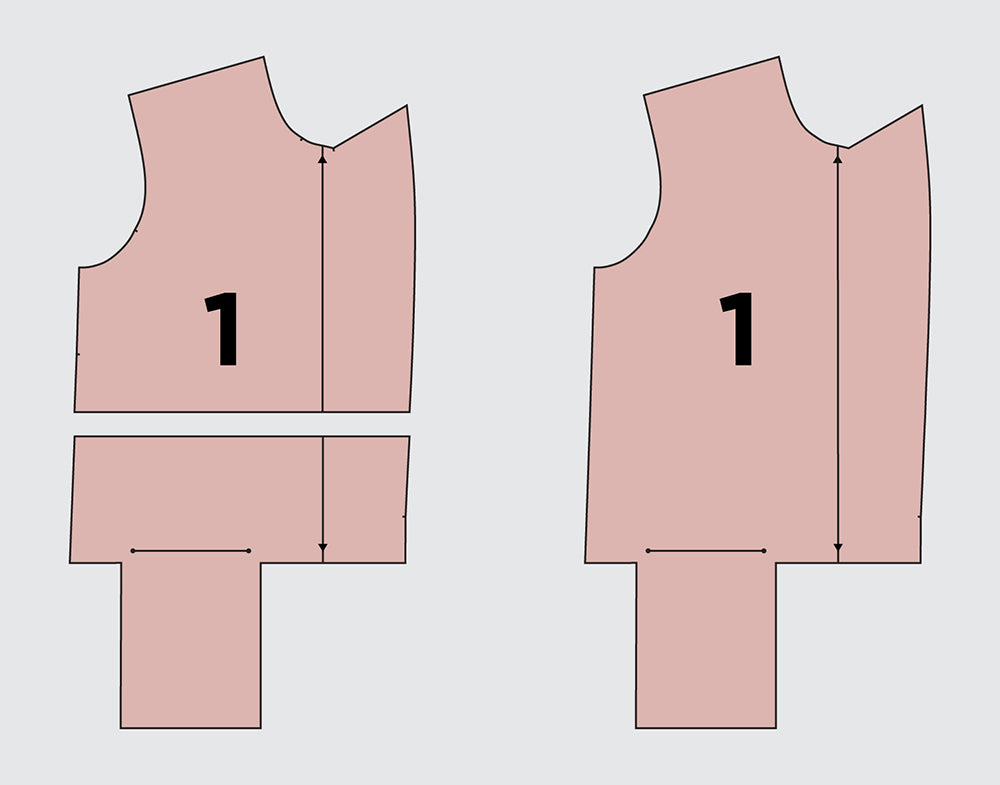

- Start by locating the pattern pieces you need to adjust, in this example I’m showing the upper and lower coat front.
- Cut between the lengthen / shorten lines marked on the pattern. With a piece of paper underneath the pattern, spread the two sections the amount you need to lengthen your piece, making sure to keep the grain line of the two pieces aligned.
- Trace your piece off onto the paper and re-blend any gagged edges along the side seam. Repeat the adjustment to any other affected pieces.
If you’re shortening the same steps apply only rather than spreading the pieces apart, you’ll be overlapping them the amount you need to shorten the pattern.
Small and Full Bust Adjustments
Now lets talk Full Bust Adjustments. The Yates is drafted for a B cup (like all our patterns) so if you’re a C you may be able to get away without a FBA. If you’d like to do a small bust adjustment you would do the opposite of what I’m showing here.
The first thing you need to do before you start your full bust adjustment is to figure out how much of an adjustment you’ll need. To begin you’ll need your upper bust measurement and your full bust measurement. Once you have those you’ll subtract your upper bust from your full bust. If the number you get when you subtract your upper bust from your full bust (the total adjustment) is over 2″ (B cup) you may need a full bust adjustment, whereas if the number you get is 2″ or under you’re either fine to use the pattern as is or you might consider a small bust adjustment. So if your full bust was 40″ and your upper bust was 36″ you’d subtract 40-36 to get 4″ which would require an adjustment.
Now you can take this new number and do one of two things with it. It seems to be the most common to just divide this number in half and apply that amount to each side of the adjustment shown below, so you would be moving the pattern 2″ in Step 3.
Your other option is to take your new number, in our case 4″, and subtract 2″ from it to get the full amount of your bust adjustment. Subtracting the 2″ comes from the fact that the pattern is drafted for a B cup which is a 2″ difference. Since this amount is already drafted into the pattern you are just adding the additional amount on top of what exists. You would then divide the full amount of the adjustment in half so you would be doing a 1″ adjustment on each side of the pattern.

To start I prefer to tape the upper and lower pattern pieces together along the stitching line so that you’re performing the adjustments on one piece rather than two. You can definitely adjust the top and then spread the bottom piece to match the added width though, it’s just what you find works for you.
Locate the apex of your bust and mark. We highly recommend making a muslin to mark your exact apex for the most exact adjustment. Everyone’s apex falls at a different place and the only exact way to find it is to try the garment on and mark it yourself. Draw a line from the apex out to the side seam. Next you’re going to draw a vertical line from the apex down to the hemline of the pattern piece making sure to keep the line parallel to the CF / grain line. From there draw a line connecting the apex to the approximate center of the armscye. These are the lines that will form the full bust adjustment.
Slash through the hemline to the bust and up to the armscye taking care to cut to, but not through, the pattern at that point. You want to make sure that the two pieces are hinged together. Then slice through the line connecting the side seam to the apex, taking care to not cut through the apex point, you want the pieces hinged. You’ll then open the vertical slit the amount of your full bust adjustment making sure that the two edges of the opening are parallel.

You’ll notice that when you move the side out for the adjustment the side panel becomes longer than the piece you moved. Draw a line extending the pocket marking out to the front edge of the coat. Cut along this line and align the newly freed piece so that it’s even with both the center front and the pocket marking on the side piece.

This method of adjustment results in a dart being formed. Fold the dart legs together with the takeup pointing towards the bottom of the garment and re-blend the side seam. I like to score the bottom dart leg and center line lightly with an awl to help the pattern fold right where you want it to on the first try. You can either cut across the side seam / dart or mark it with a pattern tracing wheel and cut when the dart is open. You can now open the dart, cut, and separate your top & bottom pieces.

One last thing you’ll want to do is to re-align the pocket markings. At the moment your pocket is wide than originally planned. If your adjustment was small you can probably get away with just connecting the two sides and rolling with it. Keep in mind if you go this route you’ll also need to adjust the width of the pocket lining pattern piece. If you have a larger dart resulting in more pocket spread you may want to consider adjusting the new width to more closely match the original pocket width.
To adjust the upper pattern piece, simply connect the two pocket markings and then re-mark the original width of the pocket. I would typically do this from the outer edge since having pockets too close to the center may look odd proportionally and feel odd functionally as well.

For the lower pattern piece all you need to do is simply move the centermost pocket notch over so that the distance between the two notches matches the distance of the original pocket. That’s it!
That’s it for adjustments for now. Next up we’ll be talking about cutting and fusing, then it’s time to start sewing!
Featured Products: