Zippers with Free Hanging Overlays

Floaty chiffon style skirts are pretty popular right now, they're incredibly easy to make and fun to wear, but it can sometimes be strange when that flowing top layer is jammed into a zipper on one side. This is the technique I used on my Cobalt Chiffon Skirt, a technique I first learned at work. We use this a lot in situations where we have an overlay or train that is fuller than the body of the dress underneath. You know what's really bad news? When your train is anchored to your bum for 7" down the center back, that'll really ruin a silhouette.
This technique is a breeze, but you'll need to know how to do a roll hem first. If you don't know how, check out my roll hem tutorial here, you'll be roll hemming in no time and you don't even need a special foot. It also wouldn't hurt to already know how to make a French seam, lucky for you I've got a tutorial on that as well. Okay, here goes!

Step 01 : Sew the inside lining layer fully (side seams and hem), inserting your invisible zipper into the left side. A 7" zipper opening for a skirt (with the measurement beginning at the true waist) is pretty standard and that's what we're using here.

Step 02 : Sew the chiffon outer layer together. Since we're using something so sheer you're going to want to use French seams . French seam the right side of the skirt from top to bottom as usual, the following steps are for the left side of the skirt only. Measure 8" down from the top of the skirt, you will be leaving this open.

Step 03 : Sew the first seam of your French seam and trim the seam allowance in half up to the 8" you left free.

Step 04 : Sew the second seam of the French seam, again stopping at the 8" mark. Clip to, but not through, the seam allowance here.
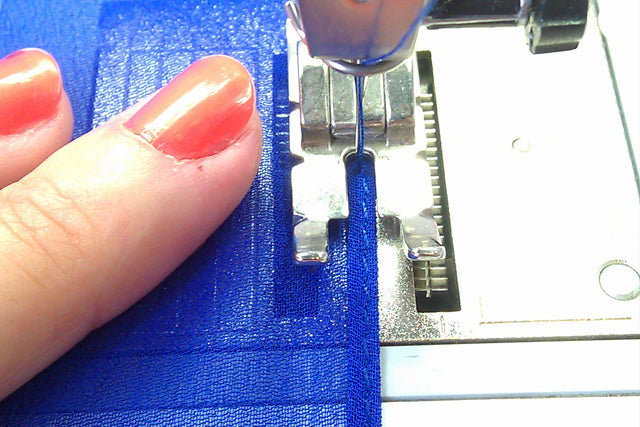
Step 05 : Roll hem the two sides of the open 8", you can see my roll hemming tutorial here if you need more in depth instructions on how to roll hem.

Step 06 : Gather your overlay to your lining pinning the roll hemmed edges right up to the edge of the zipper. Make sure you don't put the roll hemmed edge beyond where the fabric meets the zipper or you won't be able to close it all the way.

Step 07 : For my skirt I had to gather the lining once the chiffon was attached as well, so if you need to do that as well, now's the time otherwise skip this step.

Step 08 : Sew the skirt into the waistband and you're all set! I forgot to take a photo of it once I sewed on the hook and eye, but do that as well.

Here's what the skirt looks like from the front. Nice even floaty chiffon on both sides.

Here's a side shot of the skirt. I straightened out the folds so you can see what it looks like but it actually folds into itself and is barely visible. Hope that tutorial helps if you're interested in making one of these skirts for yourself. They're so easy you literally don't even need a pattern, just start ripping rectangles like I did!
As always if you have any questions feel free to email me or leave a comment below.