Adding Lining to an Unlined Blazer

You may know that I am planning a polka dot blazer this summer and in deciding what sort of blazer I wanted to make I went to three places... My closet to see what types of blazers I have that I wear a lot, the internet to see what sort of blazers are out there in the regular world, and I also checked out a lot of sewing patterns. One thing I noticed, on BurdaStyle in particular, is that there are a lot of patterns for unlined blazers and jackets.
While I'm all about the Hong Kong binding and all that (especially with pretty contrasting colors, etc.), I really sort of just like to bag it all up nice with a lining and call it a day. I'm guessing I'm not the only one so I thought I would share this little tutorial on how to create a lining for your blazer. This is also applicable on jackets, coats, and any other garment name that basically means the same type of thing. You may also notice that this is my first Illustrator based tutorial, I tried doing this tutorial in real life but it just wasn't working out so well. Between the size of blazer pattern pieces and my lack of things taller than a short chair to stand on I just couldn't fit everything in the frame so Illustrator it is!
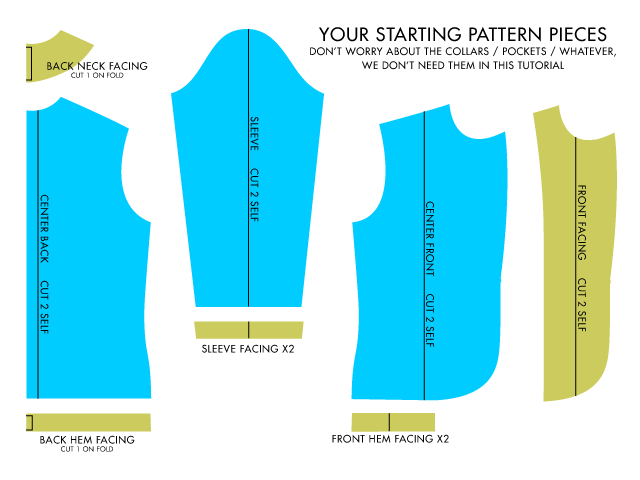
Adding a lining is really easy but it's more than just cutting the jacket pieces in lining fabric. You want the lining to be larger than the blazer in certain places to allow easy movement within the shell to avoid tearing and pulling. I am going to assume that your blazer pattern has all the facings (front, back and hems) because if it doesn't you've got bigger problems than just not having a lining. For the sake of consistency in this tutorial, none of these pieces or measurements include seam allowances. Please adjust accordingly if need be depending on your particular pattern.

First we'll do the Center Front. Trace off your front pattern piece onto a sheet of paper. Trace the front facing piece on to the front pattern piece to establish the seam line of the lining. Remember that if your pattern has seam allowance you are going to want to remove it from the seam marked Front Facing Line in the illustration above when tracing. You are now going to extend the pattern in 4 places. Extend the shoulder seam line by 1/2"and extend the side seam by 1/4" blending to nothing at the waist. Raise the underarm by 1/2" and re-blend the armhole between these two new points. To form the pleat at the hem of the jacket add 1" to the hem of the lining pattern. This amount may vary depending on the width of your hem facings but 1" will work with a 1 1/2" facing which is pretty standard. You just want to make sure that your lining doesn't hang past the bottom of the shell.
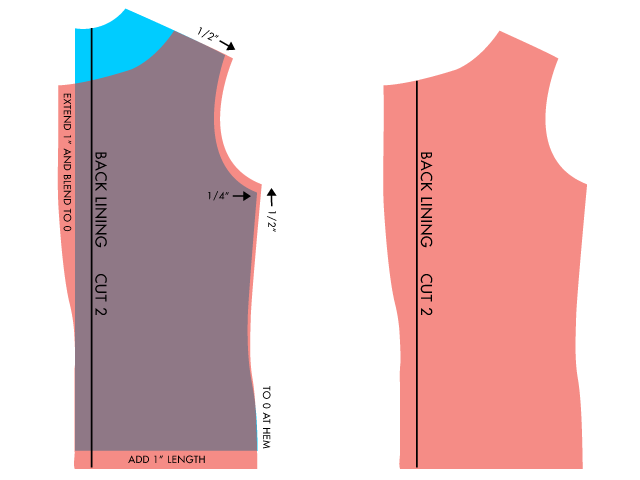
Next up is the Center Back. Follow the same steps as for the Center Front tracing the Back Neck Facing off of the pattern. We now need to add the action pleat to the center back of the lining. This will ensure that you aren't splitting your lining with all the action moves that blazers require. Add 1" to the center back neck of the lining and run that line about halfway down the pattern, curving in and blending to nothing around the waist. Remember to notch the pleat when adding your seam allowance so you know what to fold into it.

Lastly we have the Sleeve. In order for the sleeve to fit nicely into the armscye with the changes we made to the bodice we need to make equal changes to what we did above. From the cap height, remove 1/2" and raise both the front and back armholes by 1/2". Extend the side seams at the armholes by 1/4" as above blending to nothing at the hem. The reason all of the side seams are blended to nothing at the hem is to maintain the hem measurement so that it can be sewn into the facing. Again lengthen the lining by 1" to create the lining pleat.

Here they are, all of your new pattern pieces, and it wasn't even hard. Add your seam allowances, cut it out and bag that sucker up! As always if you have any questions you can leave a comment below. Happy Friday!