Make Your Own Pattern Weights!
Shop this post

Grainline Pattern Weights

I'm super excited to share our newest scrap project today – these cute little pattern weights! These are really useful to have around your sewing space. You can use them to weight your pattern when tracing it off onto your fabric, or use them if you're into tracing your patterns off rather than cutting them.

I came up with the idea for these a few months before the pandemic started because, while I have cloth weights at work, I wanted something at home that didn't take up as much space and I was tired of raiding the kitchen for canned goods to use as weights. The flat base and cone shape of these weights keeps them stable while you work, and the tab at the top makes them easy to pick up and transport.

Follow our tutorial below to make your own set of pattern weights! The pattern is available in our shop, and if you subscribe to our newsletter you can use your code to get the pattern for free! If you're not currently getting to our newsletter and would like to, you can enter your email in the footer of our website to subscribe.
Supplies

You'll have most of the items needed for this project around your sewing space already. The only thing I needed to purchase was the weighted fill, the scraps and tools I already had!
Must Have Supplies
- Pattern Weights Pattern: You can download this in our shop here. The pattern is free for newsletter subscribers.
- Heavy-weight Fabric Scraps: I used a combination of Erin Dollar and Rifle Paper Co 6oz canvas scraps. This is a great weight because it's heavy enough it will stand up to use, but is still easy to sew at your machine.
- Interfacing: Because these are going to get a lot of use and be filled to the brim, we recommend fusing your fabric before you cut. I used a mid-weight tricot fusible because that's what I had scraps of laying around.
- Scissors: You'll need paper and fabric scissors for this. Or if you're a rotary person, that works too!
- Tracing Tool: I used a #2 pencil but any tracing utensil will work great for this.
- Needles: Both hand and machine needles are needed to complete this project. Match your machine needle to the weight of fabric you used. I used 12/80 needles for mine. Any hand sewing needles will work just great.
- Pins: Again, anything you have laying around is perfect.
- Thread: I used regular 100% poly thread in a color that matched my fabric.
- Fill: For my weights I used these heavy-weight poly pellets. You'll need just under 1/4" cup of fill for each weight, so if you're only making a few you may want to go in on it with a friend...or just make them a set! You can also use any other heavy-ish fill you have on hand.
- Iron & Ironing Board: I'm sure you all have this covered.
Optional Supplies
- Bias Tape Maker: If you have one of these on hand it'll make the folding process for your tab go more quickly, but it's absolutely not needed. I used this 1/2" maker by Clover.
- Ruler: If you aren't down with eyeballing the grainline you might want a ruler. Approximation is completely fine in this project though.
- Point Press: Pressing the seam allowance of the side panel open is much easier with a point press. I have this handmade press and absolutely love it and it gets a lot of use!
Instructions

Step 1: Start by fusing your interfacing to your fabric. If you're making a few weights you can fuse a larger piece if you have one. This project is perfect for scraps though so I started with any scraps I had that were large enough to fit the pattern pieces on them.

Step 2: Trace out your pattern pieces onto your fabric. You'll notice I've included grainlines in the pattern pieces and you're probably thinking, that can't matter for a project like this! Well if you ignore it you'll be fine, but sewing the seam of the sides will be easier if the grainline is either on the straight or cross grain. I've found the seam can stretch a bit if cut on the bias resulting in a bit of a wonky shape.

Step 3: Cut your pieces out! Pretty self explanatory on this one.

Step 4: Cut a length of fabric on the straight or cross grain that's 1" wide. The length will depend on how many weights you're making. Each weight uses a 2.5" piece, so I multiplied 3" by the amount of pattern weights I was making since I like to have a little extra.


Step 5: If you have a bias tape maker this is where it'll come in handy as we need to fold our strip into quarters. If you're using one, run your strip through pressing as it comes out the other end folded. Then fold the strip in half again.
If you're not using a bias tape maker, fold your strip in half and press. Then fold each edge into the center fold and press.

Step 6: Sew along the edge to create a flat strip. If you have an edgestitch foot now's a great time to pop it on your machine!

Step 7: Trim your strip into 2.5" lengths, one for each weight you're making.

Step 8: Now we need to attach the tab to the side panel. Fold the tab in half so the two short ends meet. Then find the center of the straight edge of the side pane. Lay the tab just to the side of the center and stitch it in place within the seam allowance. It will be easier to sew the seam once this the tab is secured in place.

Step 9: Fold the side panel so the seam edges are aligned and sew using a 1/4" seam allowance. I've found it easiest to start sewing at the base and ending at the point with the tab. Trim off the corner at the tip as shown.

Step 10: Press the seam allowance open. This is when the point press comes in handy. Simply side the cone onto the point and it's so easy to press it open and flat!

Step 11: Now we need to find the quarter points of the side panel seamline so that we can evenly align it to the base. I simply folded my panel at the seamline and lightly pressed opposite it to find the halfway point. Then aligned that point with the seam line and pressed the halfway points on each side.

Step 12: Grab your base and mark the quarter points by folding the circle in half and lightly pressing the edges at the fold. Then match the pressed points and repeat.

Step 13: Align the pressed points of the base and side panel with right sides together as shown. After pinning those points I also put a pin in the center of each section to keep things in place better as I sew around the circle.

Step 14: Head over to your machine and sew around the seamline using a 1/4" seam allowance. Make sure you keep an opening to turn your pattern weight right side out! I left one section between pins open, I found that to be plenty of room to turn my weights.

Step 15: Now trim your seam allowance down to approximately 1/8". You can notch the seam allowance if you'd rather, but this method avoids the corner-type points that can happen when you clip and notch around a curve.

Step 16: Now it's time to turn your weights right side out! To do this you'll want to reach inside and grab the tab, then pull that through and the rest of the weight will follow. Trust me, this is the way you'll want to turn your weights! Once your weight is right side out, finger press along the bottom seamline.

Step 17: Now it's time to fill! I used a little cone I made from oaktag to funnel my beads into my weights. You'll want to fill that little weight up as full as you can!

Step 18: Once your weight is full, tuck the raw edges of the opening inside and pin the opening closed.
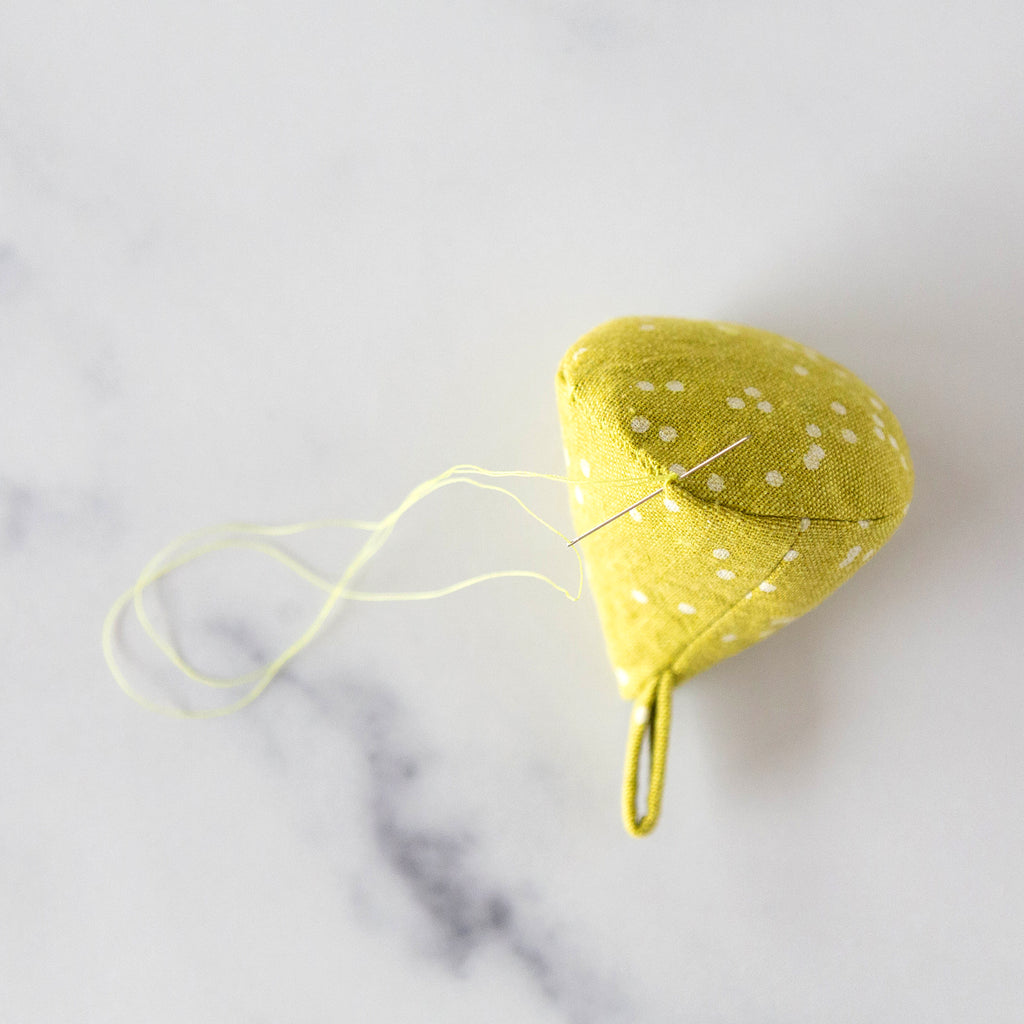
Step 19: Finally you'll stitch up the opening using your hand sewing needle and a length of thread. What stitch you use doesn't really matter, slip stitch, whip stitch, both are great, as long as your weight is securely closed up!

So that's it for making your own pattern weights!
They're quick to make, are excellent scrap busters, and also make great gifts for your sewing friends. An all around win!
I hope you make up a few and enjoy using these cuties around your sewing space. If you do end up sewing a set, let us know by sharing with us on social media! Tag us @grainlinestudio and use the hashtag #grainlinepatternweights so we can see what you made!
Featured Products: