Farrow Sew-Along: Pattern Adjustments
Shop this post

Farrow Dress

Farrow Dress
Today I have a few specific fit adjustments for you - lengthening and shortening the Farrow Dress pattern, a full bust adjustment, and blending between sizes. Lets start with the easiest first, blending between sizes.

In the above example we're blending between a size 6 at the bust and a size 8 at the hip. You'll want to blend between the bust and hip, rather than from the bust and hip because you don't want to affect the measurements at those points, just the space in between them. If you need to blend between sizes and do other adjustments, we recommend that you blend first. Make sure that you make any changes to all affected pieces. In this case you would want to do the same blending to the back of the dress.
Lengthening and shortening your pattern pieces is usually pretty straightforward, find the lengthen/shorten lines and apply the changes between them. In the case of the Farrow, due to the unique pocket construction, you'll want to make sure to adhere to the lines marked on the pattern as shown below.

I've marked the parts of the pattern pieces that are affected by the pocket placement in blue above. You'll want to make sure that no changes you make fall inside these areas or you're going to be in for a lot more pattern work.

Cut between the lines. With a piece of paper underneath the pattern, spread the two sections the amount you need to lengthen your piece making sure to keep the grain line of the two pieces aligned. Trace your piece off onto the paper and re-blend any jagged edges along the side seam and repeat the adjustment to any affected pieces.

We recommend lengthening and shortening from the top of the dress since there's more room to work with, but if you do need to adjust the lower portion and don't want to add width to the hem by adding to the bottom, split the pattern piece about an inch below where the pocket falls at the side seam. Again, trace your piece off onto the paper and re-blend any jagged edges along the side seam and repeat the adjustment to any affected pieces.
Now lets talk Full Bust Adjustments. The Farrow is drafted for a B cup (like all our patterns) so if you’re a C you may be able to get away without a FBA. If you’d like to do a small bust adjustment you would do the opposite of what I’m showing here.

The first thing you need to do before you start your full bust adjustment is to figure out how much of an adjustment you’ll need. To begin you’ll need your upper bust measurement and your full bust measurement. Once you have those you’ll subtract your upper bust from your full bust. If the number you get when you subtract your upper bust from your full bust (the total adjustment) is over 2″ (B cup) you may need a full bust adjustment, whereas if the number you get is 2″ or under you’re either fine to use the pattern as is or you might consider a small bust adjustment. So if your full bust was 40″ and your upper bust was 36″ you’d subtract 40-36 to get 4″ which would require an adjustment.
Now you can take this new number and do one of two things with it. It seems to be the most common to just divide this number in half and apply that amount to each side of the adjustment shown below, so you would be moving the pattern 2″ in Step 3.
Your other option is to take your new number, in our case 4″, and subtract 2″ from it to get the full amount of your bust adjustment. Subtracting the 2″ comes from the fact that the pattern is drafted for a B cup which is a 2″ difference. Since this amount is already drafted into the pattern you are just adding the additional amount on top of what exists. You would then divide the full amount of the adjustment in half so you would be doing a 1″ adjustment on each side of the pattern.
Select your size based on your upper bust & waist measurements. Cut size.
Locate the apex of your bust and mark. We highly recommend making a muslin to mark your exact apex for the most exact adjustment. Everyone's apex falls at a different place and the only exact way to find it is to try the garment on and mark it yourself. Draw a line from the apex out to the side seam. Next you’re going to draw a vertical line from the apex down to the hemline of the pattern piece making sure to keep the line parallel to the CF / grain line. From there draw a line connecting the apex to the approximate center of the armscye. These are the lines that will form the full bust adjustment.
Slash through the waistline to the bust and up to the armscye taking care to cut to, but not through, the pattern at that point. You want to make sure that the two pieces are hinged together. Then slice through the line connecting the side seam to the apex, taking care to not cut through the apex point, you want the pieces hinged. You’ll then open the vertical slit the amount of your full bust adjustment making sure that the two edges of the opening are parallel.

Typically when you move the side out for the adjustment the side panel becomes longer than the piece you moved. The Farrow is a bit different than your normal FBA/SBA adjustment because of the angled seams. Take your ruler and place it along the angled pocket stitching lines to check that they're still aligned.
This method of adjustment will result in a dart being formed. Fold the dart legs together with the takeup pointing towards the bottom of the garment and re-blend the side seam. I like to score the bottom dart leg and center line lightly with an awl to help the pattern fold right where you want it to on the first try. You can either cut across the side seam / dart or mark it with a pattern tracing wheel and cut when the dart is open. Unfold the dart and cut out your new piece.
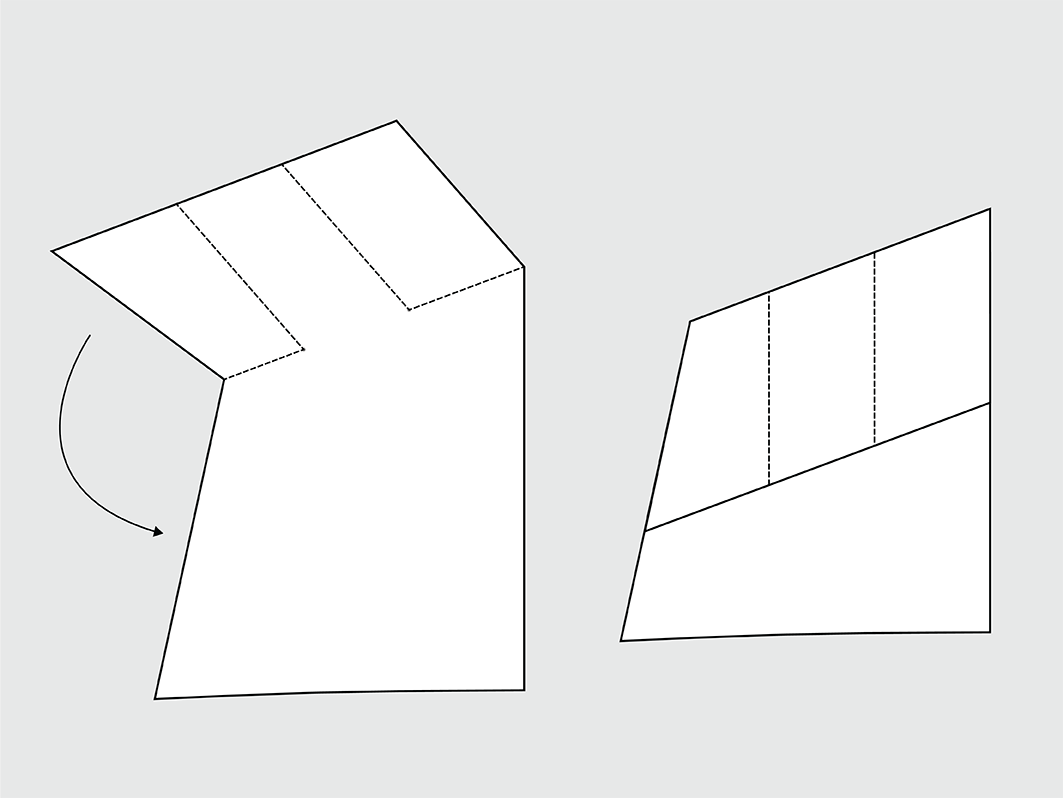
Now we'll need to adjust the lower front piece. Begin by folding the upper pocket section of the pattern down along the stitching lines.

Draw a line through the pattern piece from top to bottom parallel to the center front and equidistant from both pockets as the split line for the upper portion of the dress.
Slice through the pattern piece along this line and separate the pieces the same amount you did for the top. When separating you'll want to maintain the angle of the pockets as shown above in order to ensure everything sews together when you're done.

You'll need to tape some paper underneath the pattern to form a bridge for this last step. After we separated the two pieces the hem is lower on the left than the right. Extend the center front line down. From the bottom right corner of the left piece draw a line over to the center front, this corner that the hem and center front form should be square. This will be your new lower front piece. Unfold the pattern piece and trace off your new piece!
That's it for adjustments for now. Almost time to start sewing!


Featured Products: