Cascade Sew-Along: Collar
Shop this post

Cascade Duffle Coat

Next up in the Cascade Sew-Along is applying either your collar or hood. Today I'll be showing you how to attach your collar. In the booklet and samples, View A is shown with the collar and View B with the hood but the two are completely interchangeable. Begin by pinning the center back seam of the under collar pieces together with the right sides facing each other.
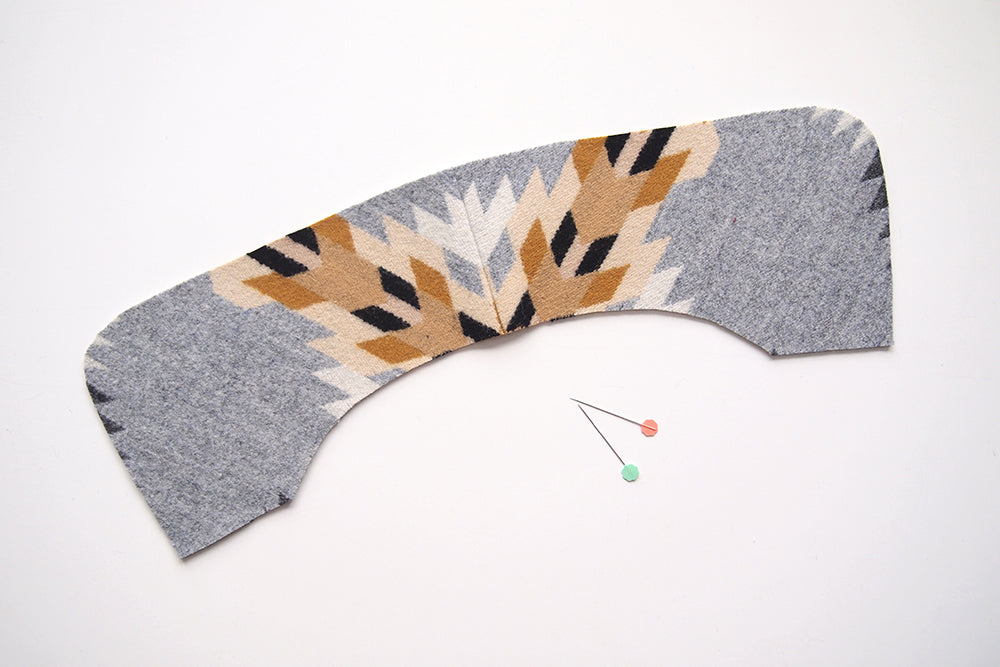

Stitch the two layers together and press the seam open.


Next, again with the right sides facing, align the under and upper collars along the outer edges and stitch the two layers together.


Grade your seams and either notch or trim your corners. I like to trim down the entire corner to about 1/8" instead of notching, it usually gives a much smoother curve. For an explanation of the differences between the two methods, you can check out this tutorial.

Head over to your ironing board and press the seam allowance and the under collar away from the collar.


You'll now want to understitch along the seam line through the seam allowance and under collar. Since the rounded edge of the corner is too tight to neatly understitch you'll just be doing this on the straight sides and back edge of the collar.

You'll now have something like this. You can see how the understitching makes the seam line want to naturally roll to the underside of the collar, this is helpful in the next step.


Press the collar flat making sure that the seam allowance rolls to the underside of the collar and that the raw edges of the upper and under collar meet.


Pin the two layers together and stitch along the raw edges of the collar at 1/4" or somewhere within the seam allowance. This ensures that the two pieces act as one while attaching the collar stand.

Next you're going to pin the non-interfaced collar stand piece to the collar with the right sides facing. Make sure you've matched your notches and your seam lines at the edge. Stitch the two layers together along the 1/2" seam allowance.

Clip the pointed ends of the collar stand so that it's flush with the edge of the collar.

Notch and grade the seam allowance of the collar stand.

Now align the interfaced collar stand with the upper collar side of the collar. With right sides facing pin in place matching notches and seam lines.

Stitch through all layers. I stitched with the interfaced collar stand facing towards the feed dogs so I could follow the stitching line I previously used exactly. This ensures that you don't see any of the previous stitching when you flip the collar stand back over.

This is what you've got after the last step. Do as you did for the other collar stand, trim the points flush, grade, and notch the seam allowance.

Press both of the collar stands down, I find this easiest to do on top of the ham, wool side up as I mentioned a few posts back.

After you've done that, run a line of topstitching along the collar stand curve to anchor the two layers together. Alternately you could stitch in the ditch along the curved collar / collar stand seam. I don't recommend putting a line of stitching along the collar side of the curve since depending on where it's placed it can affect the roll of the collar. Once you've done this, run a line of stitching inside the seam allowance at the bottom raw edge of the collar so that it acts as one layer when attaching it to the neckline.

Illustrating the roll of the collar and stitching lines.

Now we'll attach the assembled collar to the neckline of the coat. Begin by laying out the coat with the right side facing up and the under collar facing up. This is how the collar will end up attached to the coat in the end.

Fold the collar down over the coat so that the under collar is facing the right side of the coat. Pin in place matching center back, shoulder seams, and the front edge of the jacket.

When placing the front edge of the collar with the coat you want the finished edge of the collar to fall at the 1/2" seam allowance of the coat edge.

Stitch through all layers of the collar and neckline. If your fabric is particularly bulky like my this Pendleton is you may find it helpful to use a walking foot and possibly increase your stitch length to help the fabric move through your machine.

You can see here how the edge of the collar and front band match up at the corner of the 1/2" seam allowance. This is how you know that your collar and band will both meet exactly at the corner of the coat.

Your collar is now attached! Next up, assembling and attaching the hood.

Featured Products: