Hadley Modification 01: Wrap Top

Today we're going to teach you how you can modify the pattern pieces of the Hadley Top View B in order to turn it into a wrap top! This modification retains the drapey, fluid style of the original pattern while also providing a slightly closer fit. This is a fairly straightforward modification. You will modify one piece of the existing pattern and draft two new pattern pieces.
Please note that you will need the Hadley Pattern to complete this modification. If this pattern is new to you please note that we have a full sew-along with step by step instructions of the original pattern: Hadley Top Sew Along

Hadley Wrap Top Modification

Grab the Center Front piece of your Hadley Top (pattern piece 3, View B). Find and cut your size, and trace the pattern piece onto a separate piece of paper. Flip your traced off piece over and lay it on top of your original pattern piece overlapping the center front seam allowances in order to create a full front pattern piece. Trace this onto tracing paper copying markings, dart lines, and notches onto one side.

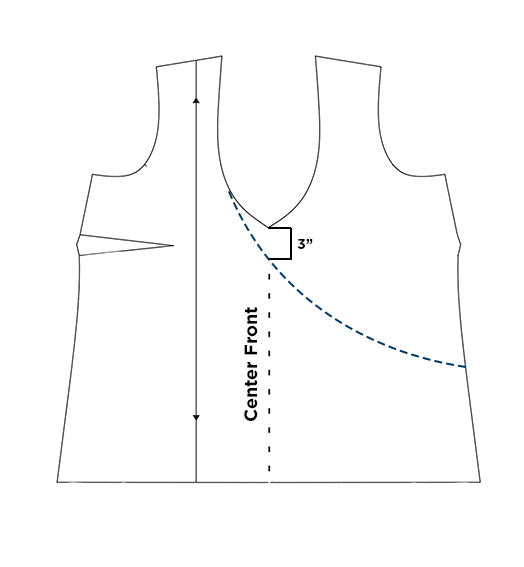
Determine how low you you want your wrap pieces to overlap across center front. Using the neckline and your overlap point as a reference draw a slightly curved line that extends down and across from the left neckline to the right front side seam. We're showing two examples of how to draw this line: 1) overlapping across the center front at the original height and 2) overlapping across the center front 3 inches (7.62 cm) lower than the original height.
The higher your pieces overlap the more likely they are to wrap across the top of your bust instead of around and below. In order to get the perfect fit, style, and drape for your body we recommend making a quick muslin of these front pieces in order to test the fit.
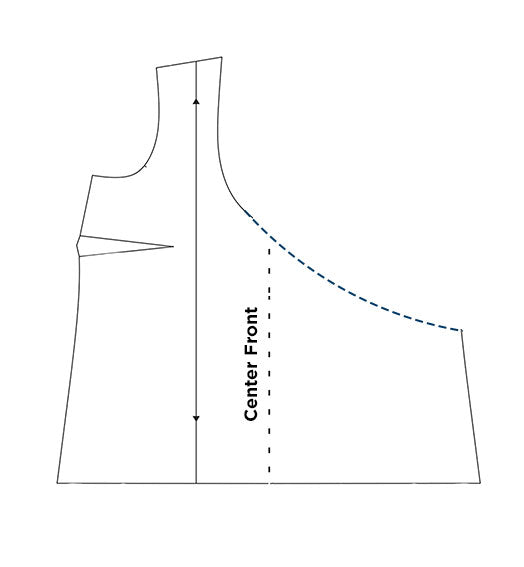

Cut along the dotted line to create your new Hadley Wrap Top front pattern piece. We will be referring to this as piece 1.5 in illustrations. Follow this cutting guide to cut out the remaining pieces you'll need for this version of the top. You won't be cutting out the front facings included with the pattern as you will be drafting a separate piece to finish the wrap neckline. We finished the neckline using a pleated rectangle to add more drape and volume, and that's the finish we'll be sharing below. If you prefer a different finish feel free finish as desired.
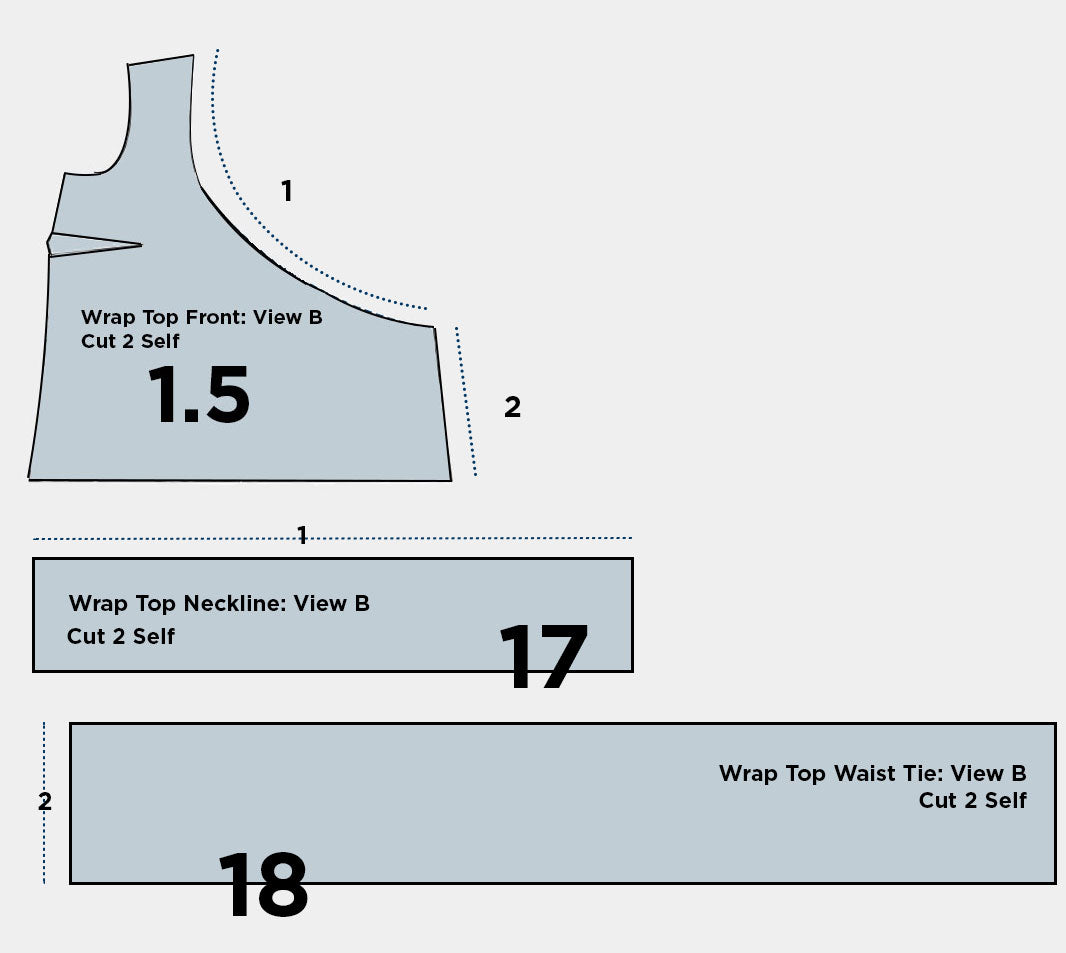
To draft the neckline finish and wrap ties you'll need to take two measurements. Measure along the neckline curve in order to determine the length of the piece you'll use to finish your neckline (1). Additionally, measure along the wrap side seam, to determine the width of your wrap tie pieces (2). Once you have those measurements you can draw your neckline finishing piece as well as your wrap tie piece.
Draw a rectangle that is the length of your neckline measurement (1) + 1 inch and a width of at least 6 inches (15.24 cm). If you want more volume and drape along the neckline make this rectangle wider. Cut two neckline pieces.
Draw a rectangle that is the width of your wrap side seam measurement (2) + 1 inch and a length of at least 29 inches (73.66cm). This length should be ample enough for most wrap configurations, but you can certainly cut shorter or longer wrap ties if you prefer. We want to note that we didn't interface our wrap ties, but do think interfacing would help keep them stable. Cut two wrap ties.
Once you have everything cut, follow the Hadley Top pattern instructions skipping steps 3 and 4 and proceeding through through Step 9. At this point you should have all of the pieces interfaced, your front necklines staystitched, your darts sewn on the left and right front sides, and your back piece complete and topstitched down.

Pin your neckline finishing piece to your left wrap front piece right sides together, and sew using a 1/2 inch (1.27 cm) seam allowance. Press the seam allowance down. Finish the opposite raw edge of the neckline finish as desired.
In order to create volume along the neckline you're going to pleat your neckline finish. You can choose how many pleats you would like and how far apart you would like them depending on the width of your rectangle and the volume and look you're going for. Originally, we marked out 1 inch (2.54 cm) markings, but ended up pleating at 1/2 inch (1.27 cm) intervals.

You can press and iron your fabric along your pleat markings in order to help you fold your fabric under. Fold your fabric in along the top of the neckline at the shoulder seam and pin it in place. Repeat these steps, folding in the same direction, on the lower edge. Anchor your pleats in place along the shoulder and side seam by sewing across using a 1/4 inch (0.635 cm) seam allowance.


Finish all edges of your wrap tie piece as desired. Attach the wrap tie to the side seam piece and sew with right sides facing and press your seam allowance open or in towards the front piece.
Repeat all steps on the right wrap front piece.
Once you have both front pieces fully prepared, with the right sides facing each other, align and stitch the shoulder seams. Finish seam allowances as desired and press towards the back of the garment.
With right sides together sew one side seam together and finish seam allowance as desired. Press the seam towards the back of the garment.
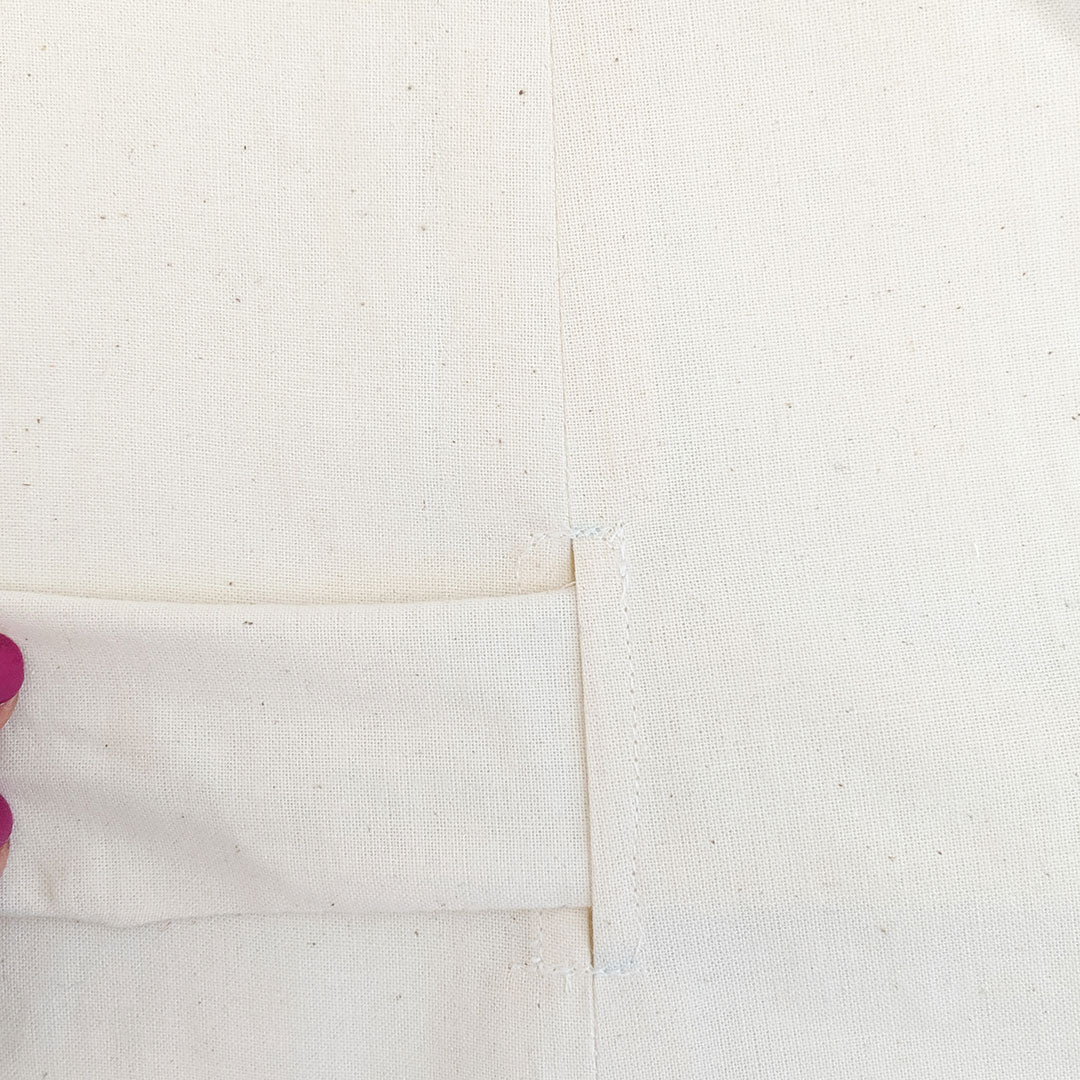
You need to leave a gap in the other side seam for your waist tie to wrap around and pass through. Before pinning the front and back pieces of this seam together finish each piece separately. Pin the pieces together right sides facing. Towards the bottom of the side seam mark and measure a gap for your waist tie to pass through. The location of this opening and width will be dependent on the width of your finished waist tie piece.
Starting at the underarm beginning sewing down to your first marking backtacking at the beginning and end. Leave the gap unsewn, and continue sewing below your second marking to the hem of the side seam.


Clip your fabric at both markings as deep as your seam allowance - 1/2 inch (1.27 cm). Press your seam open. Fold the gap seam allowances under by 1/4 inch (0.635 cm), pin in place, and then top stitch along this edge from the right side of your fabric.

Follow the remaining steps in the instruction booklet to finish your modified Hadley. When you attach your back facing you will only be attaching it along the neckline. You'll need to finish the raw edges of remaining edges, and tack the facing in place at the shoulder seams.


Let us know what you think of this modification! Will you be making a wrap top? Are there any other pattern modifications you would like to see? Sound off in the comments below.

