Cascade Sew-Along: Lining your Coat

Today is the final post in the Cascade Sew-Along, save for some variations I have planned that will pop up in the next few weeks, and we're going to be sewing the lining into the coat. We will be doing this using the "bagged" method which requires little to no hand stitching. This method seems kind of crazy when you're first reading through it but it definitely works, and works well! If you feel like you need more guidance, I have a Bagged Jacket Lining tutorial on the blog already, sometimes seeing things written out and photographed more than once can help clear out confusion, so you may want to check that out as well. And with that, lets get started!

Begin by laying the coat shell out face up and the coat lining face down on top of it.

Pin around the edges of the facings only, do not do anything with the lining yet.


Stitch around the bottom, sides, and neckline of where the coat and facings meet. You may want to turn your coat right side out at this point to double check that everything has been sewn at the right place before we seal up the coat in the next step. If you need to make any adjustments to the stitching, do that now.


Now align the hems of the lining and facing, fold back the seam allowance where the lining and facing meets. The sleeves will be tucked up inside of the body. It will seem like the lining is too short to meet the facing but don't worry about that, this is what will create the pleat when the coat is turned.

Stitch along the bottom of the hem. Clip your corners and grade the seam allowances along the seams that are sewn to the facing. You do not need to clip or grade anything related to the hem of the lining or hem facing.

Now lay your coat out in a similar fashion. We'll be attaching the sleeve facing and lining together in these next steps. I promise you'll be able to get your jacket right side out after this no matter how strange this may seem.

Fold the cuff of the sleeve lining up about 2".

Insert the folded lining cuff into the sleeve of the coat. You'll want to make sure that the sleeves aren't twisted and you have the correct seams matching each other.


The front and back underarm seams should be matching.

Stitch around the cuff at the standard 1/2" seam allowance. I've found this is the easiest setup to do so at my machine.

Your cuff now looks like this. Repeat the previous steps for the other sleeve.

After both sleeves are connected at the cuffs, find the hole you left in one of the seams of the sleeve. If you left it open you're good, if you basted it shut like I did to get a sharp seam press, then open the basting now.


You will now begin slowly pulling the entire coat out that hole. Work slowly a little bit at a time and your coat will come through just fine. This Pendleton wool is SUPER thick and it worked with no trouble.

You now have a coat that looks something like this. Pull the sleeves out and head over to your ironing board and begin gently pressing along the outer seam line to give the edges of your jacket a sharp press.

Despite the fact that none of these seams are on a curve, I find it easiest to press on the wool side of the ham because it holds the steam in longer to give a sharper press.

Once your coat is pressed, find the hole you made in the sleeve (we haven't sewn it up yet) and run your hand through it to grab the side seams of both the lining and shell of the opposite side from the sleeve you have the hole in.

Bring the both out through the sleeve hole so that they're visible and aligned next to one another.

We will now create a thread chain between the two points to reduce lining slippage at the underarm. You won't have to worry about the lining slipping far into or out of the sleeve when putting on and removing your coat. Once you've done that side, repeat for the other underarm.
threadchain from Grainline Studio on Vimeo.
The above is a small video illustrating how to make a thread chain. Apologies for the heater going on in the background, I unfortunately don't have control over that.


Once both of your thread chains are in, you can sew up the hole in the sleeve one of two ways. You could do it by hand, or run over to your machine and stitch close to the edge. I usually use the machine method but either works equally well.

Once the hole is sewn up your last step is to stitch shut the small opening in the bottom of the jacket. Align and press everything as shown above and hand stitch in place.


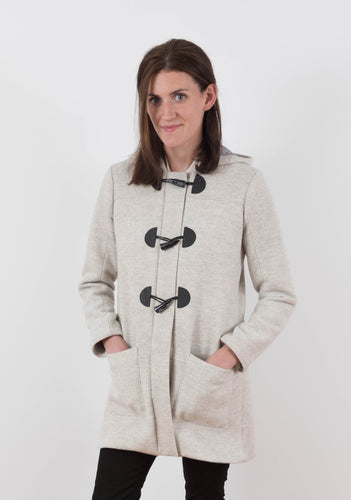
And congratulations!! You've just sewn the Cascade Duffle Coat!! I'm super proud of you and it really wasn't that hard at all was it! It's supposed to warm up a bit around here this weekend so I should be able to get some better photos of the finished coats for next week. I can't believe it but it's actually been too cold to wear any of my Cascades recently. I hope you enjoyed the sew along and learned a thing or two. Can't wait to see your finished coats!
If you're on social media consider tagging me (@grainlinestudio) or using the #CascadeDuffleCoat or #CascadeSewAlong hashtags so I can check out what you're up to with them!