Sewing Tutorial | Maritime Shorts + A Variation

If you've been waiting for the step by step tutorial on how to sew the Maritime Shorts here it is! I've also included additional steps to sew this curved hem variation so you can get more mileage out of your pattern. The tutorial is literally about 50 photos (dudes, I know I over photograph but I'm afraid of leaving out something important) so click the link below to see the full post!
Step 1 | Tape your pattern pages together and cut out your size, then cut out your fabric pieces.

Step 2 | Sew Pocket to Pocket Lining. Trim pocket lining seam allowance to ¼” and clip around curve. Finish seams as desired and press seam towards pocket lining.


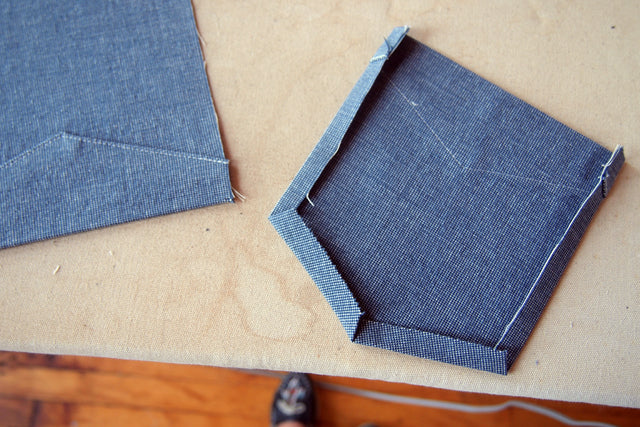
Step 3 | Sew Pocket Facings to Fronts with wrong sides facing out. Clip and grade seam, press towards Pocket Facing and understitch. Press Pocket Facing to inside of garment.


Step 4 | Lay the Pocket Lining on top of the Pocket Facing that you just attached to the shorts front with right sides together and sew along the curved line. Finish seam as desired. Baste the free edges of the pocket layers to the front at top and side seams. Set aside.


Step 5 | Attach Back Pocket. Fold seam allowance down along top edge of pocket. Fold pocket flap at notch marks so wrong sides are together and stitch 1/8” from edge. Fold seam allowances at sides and bottom under and pin to Back along pocket placement line. Stitch pocket to shorts around the folded edges at 1/8”.


Step 6 | Sew Fronts and Backs together along the side seam and inseam. Finish seams as desired and press all seams to back of garment.

Step 7 | Turn one half of the shorts inside out and another right side out. Place the right side out half inside of the inside out leg so that right sides are facing and sew from center back to the notch marking the fly placement. Clip the notch further, just shy of the seam allowance. Finish seam as desired and press to the left half of the garment.


Step 8 | Now to insert the fly. First prepare your Fly Facing and Fly Shield by fusing your interfacing to the wrong side of each piece according to the instructions that came with your fusible. You can optionally serge or zig zag stitch around the curved edge of the Fly Facing. For the fly facing you can do one of two things. Fold the Fly Shield in half with wrong sides together, sew around the side and bottom edges and either serge or zig zag stitch around the edges OR you can fold the Fly Shield in half with right sides together, stitch around the side and bottom edges and flip right side out so the seams are concealed inside of the Fly Shield.


Step 9 | Place Fly Facing on Left Front edge and stitch from top to start of crotch seam. Grade the seam allowance, press Fly Facing away from garment and understitch.

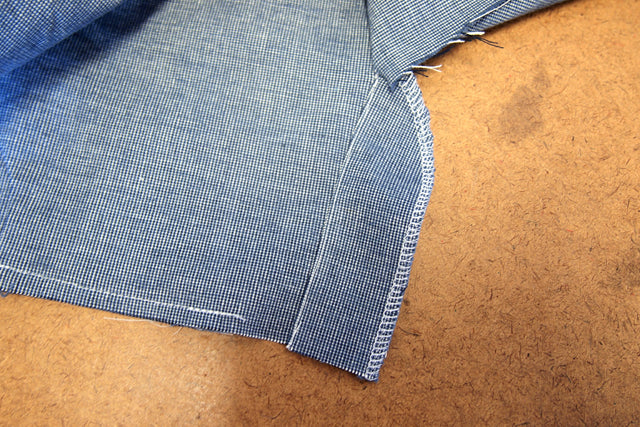
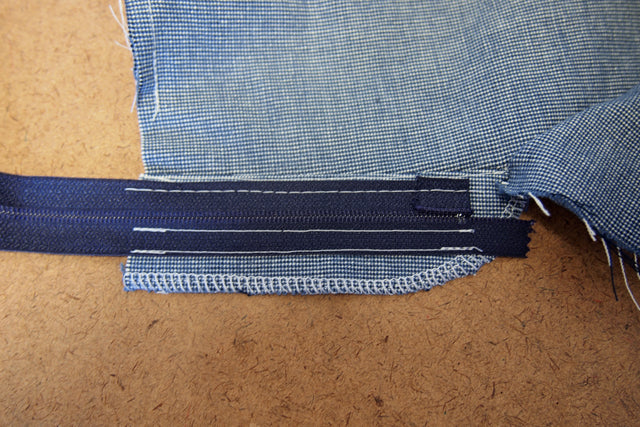
Step 10 | Place closed zipper face down along the edge of the Fly Facing making sure that the zipper stop is ¾” from the bottom edge of the facing. Using a zipper foot, baste along the right edge of the zipper with bottom edge of zipper turned up. This will keep this side of the zipper from becoming caught when you topstitch the Fly Facing curve. Sew the left side of the zipper to the Fly Facing both along the coil and along the edge of the tape.

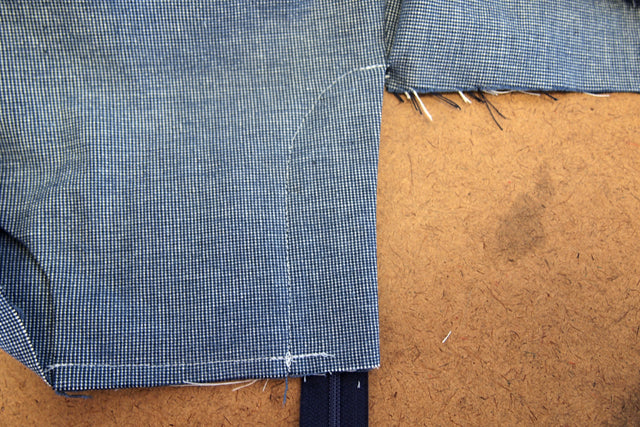
Step 11 | Turn Fly Facing to inside along the seamline and press. Baste along the curved edge of the Fly Facing about ¼” in from the edge, this is the line you will follow to topstitch the fly curve. Turn shorts right side out and topstitch along your basted line going from bottom to top. Remove basting threads.


Step 12 | Now to attach the right side of the zipper. Fold the right side of the shorts under ¼”, pin and baste to zipper. Close zipper to be sure that it is positioned correctly and evenly and that the tops of your shorts meet.


Step 13 | With the zipper closed position the Fly Shield from the inside of the shorts aligning the folded edge with the topstitching of the Fly Facing. Pin in place and flip garment to the right side. Baste along the zipper through all layers. Remove pins, open zipper and stitch along the zipper.


Step 14 | Place a bar tack across the bottom of the fly catching both the Fly Facing and Fly Shield. With the zipper open stitch across each side of the zipper tape. Trim the excess zipper tape even with the top of the shorts. Do not cut the zipper tapes without first stitching across the zipper tape!

Step 15 | Assembling the waistband. Fuse your interfacing pieces to the wrong side of the waistband pieces (Right Front, Left Front and 2 Backs) according to the instructions that came with your fusible. The fused waistband pieces will become the Waistband and the non-fused pieces will become the Waistband Facing. Sew both the Waistband and Waistband Facing pieces together with right sides facing and press seams open. Trim the fused waistband seams down to ¼”.


Step 16 | Pin the Waistband to the shorts with right sides together matching side seams and CF waistband notch. You will have ½” seam allowance overhang on each side of the waistband. Sew around the waistband, grade the waistband seam allowance and press seam up towards waistband.


Step 17 | Sew Waistband Facing to Waistband along top edge and center front seams. Clip the corners, grade the Waistband Facing seam, press towards Facing and understitch.


Step 18 | Turn the Waistband Facing to the inside of the garment and press. Fold bottom seam allowance under and stitch the facing down. I stitch mine down by stitching in the ditch but you could slip stitch as well. Sew in the hook and eye according to placement on pattern.


Step 19 | Hemming. If you're making the original version of the Maritime Shorts, you will hem by folding up the raw edge 1/4" and 1/4" and stitching in place. If you're making the curved hem variation follow below. Step 20 | Cut your bias binding for the hem, I used 1/2" binding so I cut bias pieces 2" wide. I used a clover bias tape maker to fold mine.


Step 21 | Pin the binding to the hem of the shorts with the edges of the binding extending beyond the curve of the shorts. Stitch in the fold of the bias tape from one side of the curve around to the other. Clip the overhang of the bias binding to about 1/2".


Step 22 | Fold the extra binding at the edge of the shorts down. Fold the binding around the edge of the shorts and pin in place, stitch along the edge of the binding at 1/8". Backtack across the join in the side binding.


That's it, you're done, wear your new shorts proudly!